Why Table Saw Tearout Happens
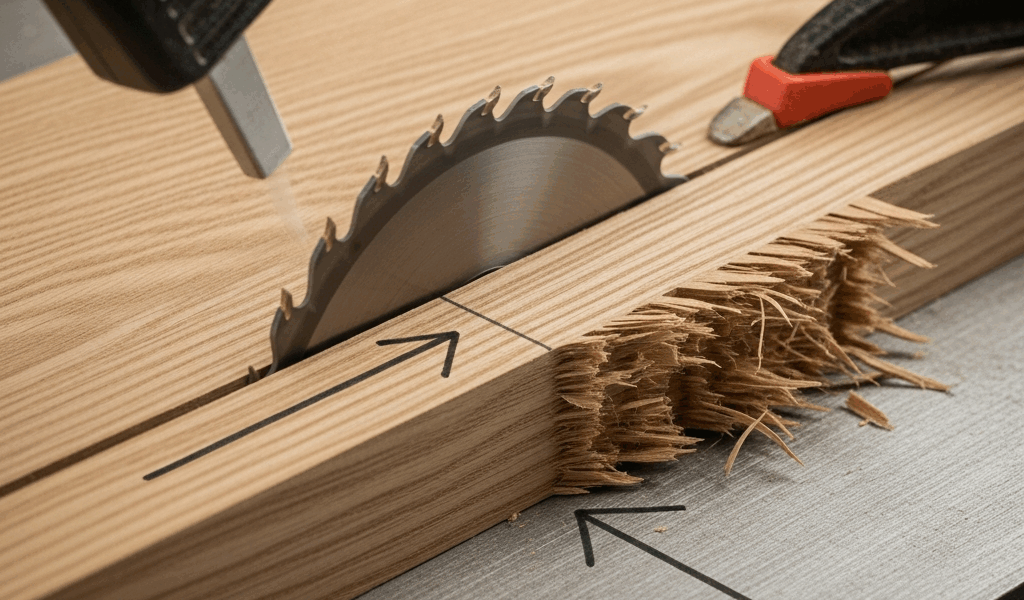
Table saw tearout isn’t some sign you’re fundamentally doing something wrong — it’s just physics fighting back. When your blade teeth hit the wood grain, they’re either slicing cleanly through those fiber bundles or yanking them violently right out of the surface. The direction those fibers run, and which way your blade travels, determines whether you walk away with smooth edges or splintered wreckage.
Here’s what’s actually going on under there: those blade teeth exit the back of the cut and pull upward on wood fibers that want nothing more than to stay attached. When those fibers run backward relative to your blade direction, they lift out in whole chunks instead of shearing cleanly. Honestly, it’s not about whether you’re skilled enough. It’s grain orientation straight-up working against your cutting direction. Once you understand this, everything changes about how you solve the problem.
Check Your Blade First
Before you start blaming your technique or the wood species, take a hard look at your blade. A dull blade is the silent tearout multiplier. I learned this the hard way — ran the same 60-tooth combo blade for probably 8 months of regular shop time before I even realized how badly my crosscuts had deteriorated.
Dull teeth don’t slice anything. They crush and tear fibers instead. The blade generates excessive heat, pushes harder into the wood, and creates tremendous exit pressure that launches splinters everywhere. A sharp blade? It slices cleanly and creates minimal fiber disturbance.
Your blade type matters just as much. A rip blade (24–30 teeth, large gullets) is designed to move stock quickly along the grain — not what you want for crosscutting. A crosscut blade (60–80 teeth, small gullets) slices across fibers with minimal tearout. A combo blade (40–50 teeth) handles both orientations reasonably well, but won’t excel at either. If you’re primarily crosscutting — which is where tearout really bites — a dedicated 80-tooth crosscut blade from Freud, Forrest, or Diablo runs $30–$60 and absolutely pays for itself in cleaner cuts and fewer ruined boards.
Check sharpness by holding your blade up under bright light. The teeth should gleam uniformly. A dull tooth looks dull and rounded — obvious once you see it. If you’re still uncertain, run your finger carefully perpendicular to the edge (not along it). Sharp teeth will bite slightly. If you’re hesitating to touch it, it’s probably sharp enough.
Read the Grain and Cut Direction
This is the core fix that stops most tearout before it even starts. Grain direction determines everything.
Stand in front of your workpiece and look at it. Grain isn’t random scratches — it’s the actual alignment of wood fibers, and it absolutely has a direction. Think of petting a cat: one direction is smooth (with the grain), the other is rough (against the grain). On a board, grain typically runs along the length, but the angle shifts depending on how the tree got milled.
The golden rule: cut so the blade encounters grain fibers at an angle that shears them downward and away from the blade’s exit, rather than lifting them up and out. In practical terms, you want the grain to “rise up” in front of the blade as it approaches, not behind it.
Here’s how to actually identify grain direction on your specific board: look at the edge of your wood. You’ll usually see grain lines running through. Trace them to the face. The grain “lifts” when you’re looking at fibers rising toward that edge. Stand at the side of the board where the grain appears to rise as it moves toward the edge you’re about to cut. Your blade should travel in that same direction — from the “rising” side toward the “falling” side. This minimizes fiber lift at the exit.
Can’t see the grain clearly? Cut a test piece instead. Mark your two proposed directions with a pencil, then crosscut a scrap that matches your stock. One direction will tear more. That’s your answer — two minutes, and you’ve saved yourself ruined stock.
Three Proven Cutting Techniques
1. Scoring Cuts — Make a shallow first pass (1/16 inch or less) at your blade height, pulling the board backward slightly or feeding slowly to establish a clean kerf. Then raise the blade to full depth and make the real cut. That shallow kerf gives you a clean “wall” for the full-depth blade to shear against, preventing fibers from lifting out. This works exceptionally well on figured walnut and curly maple where grain direction shifts unpredictably.
2. Backing Board Technique — Clamp or tape a sacrificial board (same thickness, straight-grained pine works fine) to the back face of your workpiece as the blade exits. The backing absorbs tearout energy and prevents fibers from lifting out of your good surface. This is your insurance policy when you’re uncertain about grain direction. Use 1/2-inch plywood or solid pine — expect to replace it every few cuts.
3. Feed Rate Control — Slow your feed rate way down on crosscuts. Seems counterintuitive (won’t slower cut worse?), but controlled, deliberate feeding gives the blade actual time to slice fibers rather than force its way through. Aggressive feeding causes the blade to bounce slightly and generates exit tearout. Aim for a feed rate where the blade is clearly cutting, not straining, and you’re guiding the board without forcing it. Listen to the sound — a smooth, consistent hum beats labored grinding noise.
Species-Specific Tearout Fixes
Softwoods like pine forgive most mistakes because the grain is typically straight and the fibers are soft. Grain direction still matters, but tearout usually stays mild. Your real enemy with pine? Chipout from dull blades.
Oak (red and white) has more dramatic grain variation and interlocking grain that reverses direction within the same board. A backing board saves you here — just accept you’ll need it and plan accordingly.
Walnut is gorgeous but grain direction shifts unpredictably across the board. Scoring cuts work exceptionally well. The wood is harder and holds fine details, so the extra kerf shows less than softer species. I’ve found walnut tearout responds better to technique adjustments than material fixes.
Figured woods — curly maple, spalted maple, birdseye veneer — have grain directions that change constantly. These woods almost always need a backing board. No amount of technique compensates for grain that reverses mid-board. Accept this reality upfront and plan your approach.
Exotic hardwoods vary wildly. Teak, rosewood, and other oily woods sometimes benefit from a slower feed rate and sharp blade because they’re dense. Cherry can surprise you with interlocking grain similar to oak. When you’re working with unfamiliar wood, make scoring cuts or backing board your default move.
When to Accept Tearout and Cut Again
Probably should have opened with this section, honestly. Not every tearout situation warrants fighting physics. Some pieces are just worth a second pass.
If you’re cutting 4/4 stock and the tearout is shallow (under 1/32 inch), sand it out with 120-grit in under a minute. If tearout is deeper, making a fresh cut from the other direction or using a router with a flush-trim bit on the edge is sometimes faster than fixing the damage.
On visible faces — table tops, cabinet sides, anything that gets hand-sanded and stained — tearout becomes a quality issue. Make your second cut confidently. Backing board, slower feed rate, verify grain direction twice. The second cut almost always succeeds.
On hidden faces or components that get further shaping (rails, stiles, pieces getting routed), minor tearout doesn’t matter. Move forward. Routing or additional jointing erases it.
Your time has value. If stopping tearout requires setup that takes longer than making a second cut cleanly, the second cut is the right call. But when tearout happens on a piece you can’t redo, you’ll be grateful you know backing boards exist.


Stay in the loop
Get the latest classic custom wood furniture updates delivered to your inbox.