Why Your Router Bit Is Burning the Wood
Router bit burning has gotten complicated with all the conflicting advice flying around. As someone who torched a walnut edge profile on my very first commission piece — watching honey-brown wood go charcoal black in real time — I learned everything there is to know about this problem the hard way. Today, I will share it all with you.
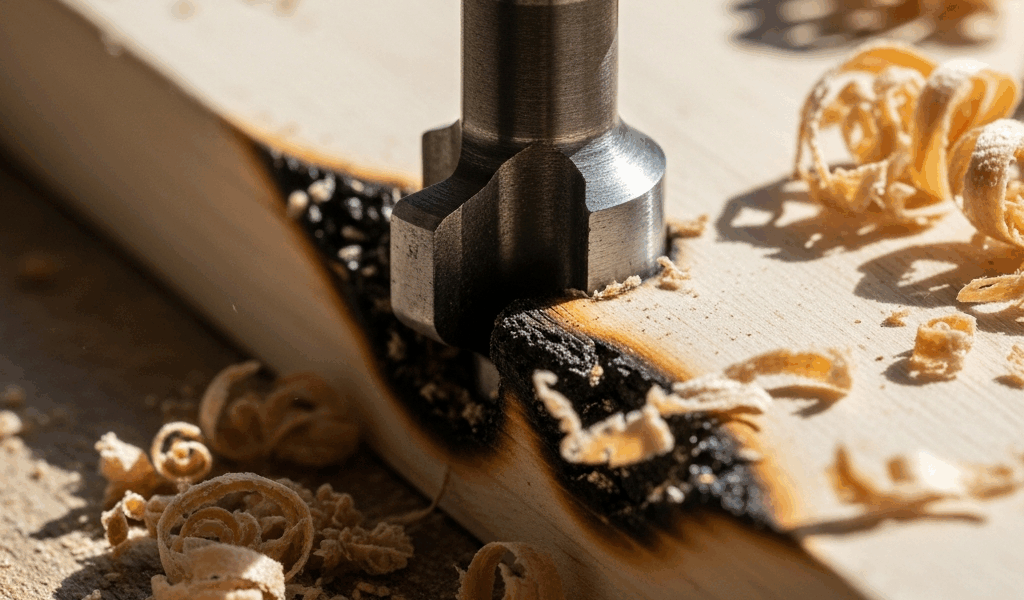
But what is router burn, exactly? In essence, it’s friction heat scorching wood fibers at the cutting edge. But it’s much more than that. A dull bit, a sluggish feed rate, an RPM that’s too high for the bit diameter, or resin-caked flutes — each one produces that same dark, crusty burn line. Each one needs a completely different fix. Chasing random solutions without identifying your actual cause is how woodworkers waste entire afternoons.
Dull bits crush fibers instead of slicing them. Slow feed rates leave the bit rubbing one spot too long — maybe two seconds too long, which is enough. Large-diameter bits spinning at high RPM generate brutal surface speed at the outer edge. Gunked-up flutes can’t clear chips, so the bit stops cutting and starts heating. Once you understand that, the diagnosis practically does itself.
Quick Diagnosis — Find Your Actual Cause First
Before you touch a single setting, answer these four questions honestly:
- Is the bit dull or heavily used? Have you run this bit through dozens of feet of stock, or does it show visible wear or chatter marks? If yes, go to the “Dull Bit” section below.
- Are you moving slowly or hesitating mid-cut? Do you find yourself creeping the router forward, or stopping partway through a pass? If yes, your feed rate is the problem.
- Is your bit large-diameter running at high RPM? A 1.5-inch bit at 24,000 RPM will burn almost any species you throw at it. Check the bit size against your speed dial.
- Is there dark, crusty buildup on the flutes? Look at the grooves where chips exit. Heavy coating means pitch and resin are dragging the cut.
Probably should have opened with this section, honestly. Most woodworkers adjust three things simultaneously and never isolate the real problem. One of those four questions will point you straight to the right fix below.
How to Fix Router Bit Burning Step by Step
If the Bit Is Dull — Replace or Clean It First
Dull bits are the most common culprit. I’m apparently hard on carbide edges, and Whiteside bits work for me while cheap import bits never survive a full project. If you’ve pushed the same 1/2-inch roundover through 200 board feet of hard maple, it’s finished. Replacement is cheaper than the time spent fixing scorch marks. Whiteside, Amana, and Freud bits in the $15–$40 range outlast bargain imports by roughly three to one. Don’t make my mistake of nursing a dead bit for one more pass.
Before you buy, though — check for pitch crust. Resin buildup mimics dullness almost perfectly. A 20-minute soak in mineral spirits or acetone, followed by a brass brush scrub, can resurrect a bit that looked hopeless. If the cutting edge is genuinely rounded or chipped after cleaning, that’s when you reach for the credit card.
If Feed Rate Is Too Slow — Keep Moving, No Matter What
This was my biggest mistake early on. Slower felt like control. Better finish, I thought. Wrong. A slow feed rate means the bit dwells in one spot, friction climbs fast, and the wood scorches before you’ve moved an inch.
Move the router in one smooth, continuous pass. The bit should pull the router slightly forward — that’s normal when feeding against the rotation. Work with it. A correct feed rate sounds like a steady, confident cutting tone, not a whine or a crackle. Hesitate even briefly and you’ll burn. Speed varies by bit diameter and wood species, but consistency matters more than hitting any specific number. Pause mid-cut and that spot is gone.
If RPM Is Too High — Dial It Down for Larger Bits
Here’s a simple rule that covers most situations: bits over 1.5 inches in diameter belong in the 12,000–16,000 RPM range. Bits under 1 inch can safely handle 20,000–24,000 RPM. That’s what makes bit diameter so critical to us woodworkers — a larger diameter means the outer cutting edge travels faster at identical RPM, so surface speed becomes brutal without any warning on the display.
Your router manual lists recommended speeds by bit size. If it doesn’t — or you lost it like I did — check the manufacturer’s website directly. A 2-inch flush-trim bit at 24,000 RPM burns like a branding iron against the stock. Drop it to 14,000 RPM and that same bit cuts clean. That’s a real difference for one number change.
If Pitch and Resin Are Caked On — Clean the Bit Properly
Soak the bit in Goo Gone, CMT Formula 2050, or any dedicated router bit cleaner for 15–30 minutes. Then scrub the flutes gently with an old brass brush — a soft brass wire wheel works well too. No steel wool. Ever. Steel scratches precision-ground edges and creates new friction points. Rinse with water afterward and dry the bit completely before storing or using it.
Stubborn buildup needs a longer soak, maybe 45 minutes full-strength. The goal is bare carbide again, not damaged carbide. A freshly cleaned bit cuts noticeably cooler and faster — the difference is immediate.
Wood Types That Burn Easier and How to Adjust
Pine, fir, and cherry burn far more aggressively than oak or hard maple. Their natural resins soften under heat, gum up the flutes almost instantly, and create drag that compounds into more heat. Running pine at the same settings that work beautifully for maple is a reliable way to scorch every single pass.
For resinous species, move faster — not slower — and use the sharpest bit available. Higher feed rate means less heat accumulation. Counterintuitive, but that’s what makes routing resinous woods tricky for beginners. Drop RPM a few thousand below what you’d use on hardwoods too. A 1/2-inch roundover in cherry might run at 18,000 RPM instead of 22,000. Small adjustment, big difference.
End grain is its own problem. It burns almost instantly if technique slips — porous grain ends absorb and hold heat faster than face grain. Use the sharpest bit you own, maintain a steady pace, and clamp a backer board on the exit side. Tearout at the exit edge causes hesitation. Hesitation causes burning. So, without further ado, address the tearout first and the burn usually disappears with it.
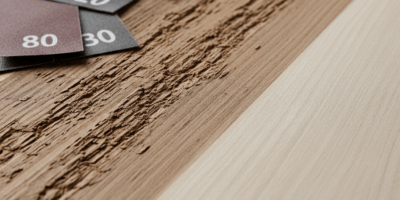
How to Sand Out Router Burn Marks Without Losing Detail
If the burn already happened — don’t panic. Light surface scorching comes out with patience and the right approach.
Start with 120-grit on a random-orbit sander or by hand, working with the grain. Sand gently until the char fades, then step up to 150-grit, then 180. For tight profiles and routed edges, a card scraper works better than sandpaper — it removes scorch cleanly without rounding over the crisp detail that makes the profile worth keeping.
Stop before you sand the profile away. Burn marks lighten dramatically under finish, so over-sanding costs you more than the original burn did. Deep burning that penetrates well into the wood fibers may not fully disappear regardless of how much you sand — that’s the burn telling you the technique needs fixing on the next piece, not the current one.
Full circle: the fastest fix is prevention. Diagnose first, change one variable at a time, then cut. Your finish coat will thank you — and so will whatever client is waiting on that walnut edge profile.


Stay in the loop
Get the latest classic custom wood furniture updates delivered to your inbox.