Why Wood Grain Raises After Staining
Wood finishing has gotten complicated with all the conflicting advice flying around. As someone who has ruined more than one project chasing the perfect stain job, I learned everything there is to know about grain raise the hard way. Today, I will share it all with you.
But what is grain raise? In essence, it’s what happens when moisture in your stain causes wood fibers to swell and stay swollen after drying. But it’s much more than that. Water-based stains are the usual culprit — the water content soaks into fibers, puffs them up, and they never fully settle back down. Oil-based stains pull the same trick on wood that wasn’t properly prepped beforehand. Even a thin layer of mill glaze or shop dust creates uneven absorption, leaving weird pockets of raised texture you didn’t ask for.
The good news? You don’t need to strip anything. You won’t lose the color you’ve already built up. The fix is surprisingly manageable — at least if you know which stain you’re dealing with. So, without further ado, let’s dive in.
How Bad Is It — Can You Still Save the Project
Probably should have opened with this section, honestly. Not all raised grain is the same beast.
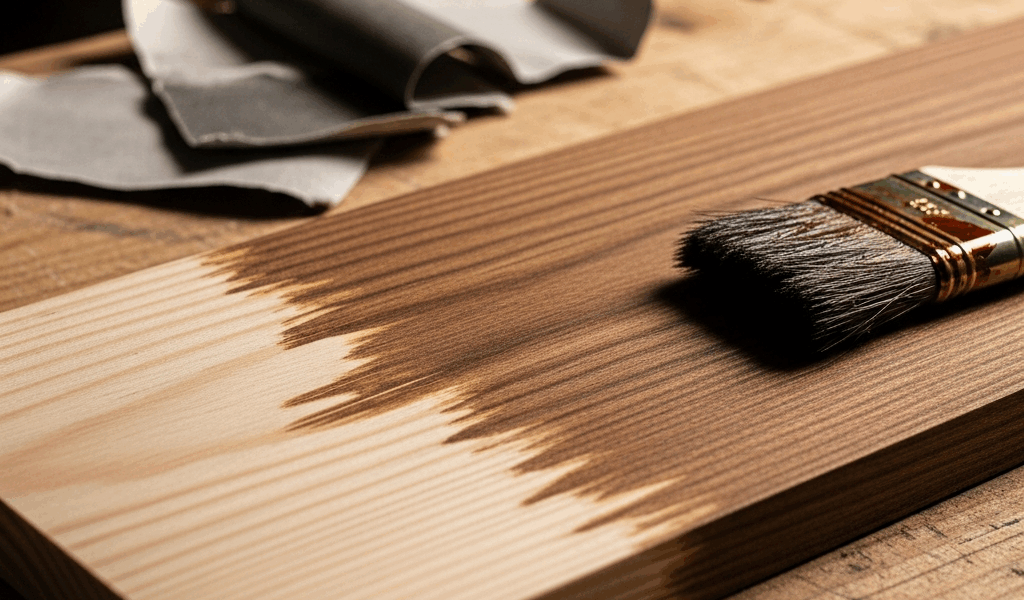
Light grain raise is mostly a texture problem. The surface feels faintly fuzzy, like fine peach fuzz across the wood. Color looks even. Nothing is visibly poking up. This version takes maybe 20 minutes of actual work per side and barely qualifies as a crisis.
Moderate grain raise looks blotchy. Fibers have popped unevenly, creating a stippled, almost pebbled appearance. The color reads dull in those spots — raised grain catches light differently than flat grain, and it shows.
Severe grain raise is the genuinely rough situation. Fibers are visibly standing up. Running your hand across it feels legitimately splintery in places. Color variation is obvious where those raised fibers grabbed extra stain during application.
Timing changes everything here. Wet or tacky stain gives you more options than fully cured stain does. Dry stain means sanding is non-negotiable, and reapplication might follow. Knowing where you stand prevents you from burning an afternoon on the wrong fix entirely.
Fixing Raised Grain on Water-Based Stain
Water-based stains need to cure fully before you touch them — at least if you want to avoid smearing everything into a muddy mess. That means 24 hours minimum, sometimes 48 if your shop runs humid. I’m apparently a chronic under-waiter, and Minwax Water-Based stain works for me now that I wait the full stretch, while 12-hour sanding never actually worked. Don’t make my mistake.
Once it’s genuinely dry, here’s your move:
- Inspect the surface under raking light. A single work lamp held low and sideways reveals raised grain that overhead lighting hides completely.
- Grab 320-grit sandpaper. You could go 400-grit — it’s gentler — but 320 gives you enough cutting power to knock down stubborn fibers without blowing through the stain layer.
- Sand lightly with the grain using even, deliberate pressure. Two or three passes per area, maximum. You’re shaving down fuzzy fibers, not reshaping wood.
- Wipe the surface with a barely damp cloth. Not wet — just enough moisture to pull the sanding dust off cleanly.
- Wait 30 minutes, then check color and texture under that same raking light.
- If the grain is flat but color looks dull or uneven in spots, a thin second coat of the same water-based stain evens things out. Keep the application light.
Soft woods are unforgiving here. Pine and poplar eat through water-based stain layers faster than you’d expect — the stain film is thin, and aggressive sanding exposes bare wood in under a minute. Gentle pressure matters more than speed.
On flat surfaces like tabletops or large panel faces, a 3M 7447 scuff pad replaces sandpaper entirely. It’s slower. It’s also a lot harder to accidentally cut through the color with one.
Fixing Raised Grain on Oil-Based Stain
Oil-based stains are slower on every timeline — and I mean every timeline. Minwax Classic Oil stain, for example, feels dry to the touch somewhere between 4 and 8 hours. That’s a trap. Full cure takes closer to a week. Sanding too early turns raised grain from a minor annoyance into a full smear disaster that makes grain raise look charming by comparison.
If you’re dealing with raised grain after oil-based stain, commit to this sequence:
- Wait a minimum of 48 hours before touching anything. Seventy-two hours is the safer call — I’ve rushed this twice and regretted it both times.
- Dampen a clean cloth with mineral spirits and wipe the entire surface down. This lifts surface dust and any remaining tackiness without disturbing the stain underneath.
- Let the surface sit for a full hour after that mineral spirits wipe. No shortcuts.
- Sand with 400-grit paper, light strokes, always with the grain. Oil-based stain cures harder than water-based — 400-grit is plenty aggressive enough.
- Follow up with a dry tack cloth to pull every particle of sanding dust before you assess anything.
- Only recoat if the color is genuinely mottled. Spot-touching oil-based stain is tricky to blend evenly, so make sure recoating is actually necessary before committing.
That mineral spirits wipe isn’t optional — it’s what separates a 30-minute fix from a strip-and-restart situation. Sanding into soft, under-cured oil stain smears pigment into the grain in ways that are basically irreversible without chemical stripper.
How to Prevent Grain Raising on Your Next Project
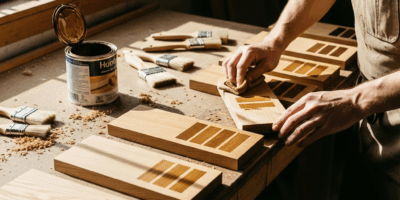
Frustrated by discovering raised grain after a full stain application, most woodworkers eventually stumble onto pre-raising using distilled water and a sponge — usually after one project too many. This new approach took off several years back and eventually evolved into the standard pre-finish step enthusiasts know and swear by today.
While you won’t need any special products, you will need a handful of basic supplies: distilled water, a clean sponge or cloth, and either 180 or 220-grit sandpaper. First, you should wet the bare wood before stain ever touches it — at least if you want to solve this problem permanently rather than repeatedly.
Apply the water evenly across every surface you plan to finish. Let it dry completely. That’s usually 2 to 4 hours depending on humidity — in a damp basement shop in July, budget closer to 4. The water will raise the grain intentionally. Once dry, sand it flat with 180 or 220-grit. Done. Those fibers have already made their move and been knocked back down. They have nothing left to do when stain hits them.
220-grit might be the best option for hardwoods, as grain raise on oak or walnut requires less aggressive cutting. That is because hardwood fibers are denser and don’t stand up as dramatically as pine or poplar fibers do. Softwoods — go 180-grit first, then follow with 220 if the surface needs smoothing.
That’s what makes this pre-raise step endearing to us woodworkers — it adds maybe an hour to prep, costs nothing extra, and completely eliminates a problem that otherwise shows up at the worst possible moment. It just requires planning ahead. Which, honestly, is the part of woodworking everyone conveniently forgets until it’s too late.


Stay in the loop
Get the latest classic custom wood furniture updates delivered to your inbox.