Why Your Pyrography Pen Is Burning Too Deep
Pyrography has gotten complicated with all the conflicting advice flying around. Everyone’s got a tip, a trick, a YouTube tutorial filmed in a garage. I’ve sat through most of them. As someone who melted through an actual commission piece — a piece someone was paying me for — I learned everything there is to know about why pyrography pens burn too deep. Today, I will share it all with you.
So, without further ado, let’s dive in.
There are three culprits. Almost always the same three. And the good news is you can fix all of them mid-session without starting over.
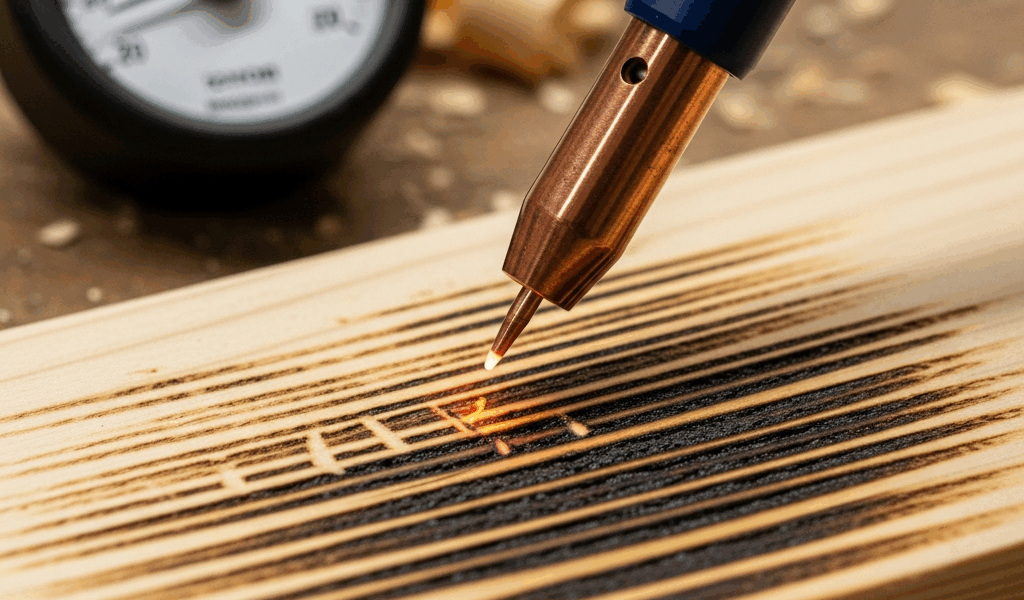
Your temperature is probably too high for whatever wood you’re working on. Basswood and pine aren’t oak. They’re not maple. A $35 beginner pen — the kind that ships in a plastic case with twelve interchangeable tips — runs hot. Not a little hot. Often 50 to 100 degrees hotter than whatever number the dial claims. I found this out at what I thought was a reasonable 600°F setting. The wood disagreed.
Your hand speed is also probably too slow. This one surprises people every time. Heat accumulates where the tip sits — the wood keeps darkening, keeps deepening, even when the temperature setting is technically fine. Rhythm matters here, not just precision.
And your tip angle is likely too steep. Holding the pen nearly perpendicular concentrates everything into a needle point. The heat has nowhere to go except straight down. Softer woods like basswood — which burn cleanly around 750–850°F — don’t stand a chance against that kind of focused pressure. Harder woods like oak want 900°F or above, but the angle problem hits those too.
Most budget units lie about their output temperature. The numbers on the dial are, honestly, educated fiction. That’s not pessimism. That’s just how the cheap tools work.
Check Your Temperature Setting First
Probably should have opened with this section, honestly. This fix takes about 30 seconds and solves the problem roughly 60% of the time.
Before you touch your actual project again, grab a scrap piece from the same board. Same wood species, same grain direction, same everything — this part matters. Do a test burn at your current setting. Three seconds. Look at what it left behind. Charred black? Crispy edges? Visible smoke curl? That’s too hot.
Drop the dial two full marks. Most pyrography units have ten increment marks on the dial — two marks is a meaningful reduction without overcorrecting. Three seconds again on fresh scrap. The goal is dark brown to black, not char-black.
But what is “adjustable temperature” on a budget pen? In essence, it’s voltage control. But it’s much more than that — or rather, it’s much less. A $25 Walnut Hollow knockoff and a $120 Razertip will produce wildly different results at the exact same dial number. One has a rheostat. One has actual temperature regulation. They’re not the same tool wearing the same label.
Start low. Work your way up. I’ve salvaged maybe four pieces total by dropping the dial after the damage was already done — and every single time, going backward was pure guesswork. Don’t make my mistake.
Adjust Hand Speed and Tip Pressure
You’re mid-burn. You don’t want to stop. Fine. Here’s what to change right now.
Move faster. Faster than feels natural — faster than your instincts want you to go. Your hand should glide across the wood the way you’d draw with a Copic marker, not the way you’d scratch a lottery ticket. Every second you slow down, heat accumulates. The temperature doesn’t change. The damage does.
A fast pass leaves a crisp, controlled line. A slow pass over that exact same path — same temperature, same pressure — leaves a trench. Wide, dark, mushy at the edges. The pen doesn’t care about your intention.
Tip pressure matters just as much. Your pen should contact the wood with roughly the weight of the tool itself — under a pound of force. I’m apparently heavy-handed and had to consciously practice floating the tip, while feather-light contact never clicked for me until I watched my own hand on video. If you’re leaning into the work, you’re pressing the tip into the grain and forcing more surface contact than you want.
Speed and pressure work as a team. Fast with hard pressure still over-burns. Light with slow speed still smolders and chars. You need both adjustments together.
Test on scrap first — burn a series of lines at increasing speeds, all at the same temperature. Slow, medium, fast. The difference is immediately obvious and it’s a better teacher than anything written here.
Match Your Tip Type to the Detail Level
Shading tips are wide or flat. Fine-line tips are pointed or narrow. That’s not a preference — that’s their function. At the same temperature, a shading tip distributes heat across a larger surface, which is exactly what you want for filling in areas. It is not what you want for detailed linework.
A fine-line tip might be the best option here, as detailed pyrography requires concentrated contact and real directional control. That is because the narrower contact point actually lets you work a little slower and still get clean results — the heat footprint is smaller, so it forgives you slightly more.
Trying to do fine detail work with a shading tip means you’re fighting the tool constantly. That’s how you end up with burnt edges exactly where you didn’t want them — damage that’s genuinely difficult to walk back.
Most kits ship with both tip types. Use them for what they were designed for. Fewer tool changes isn’t worth what you lose in control.
How to Salvage a Board You Already Burned Too Deep
Some burns can’t be unburned. But some can be softened — blended well enough that the piece survives.
Light sanding with 220-grit paper, moving with the grain, can feather out the edges of a shallow over-burn. You’re not trying to erase the mark. You’re smoothing the transition between burned and unburned wood — turning a cliff into a slope. Run your hand across it. Does it feel like a smooth valley or a sharp crater? A valley might be saveable. A crater is probably not.
Frustrated by an accidental deep line ruining an otherwise clean piece, some woodburners have turned the mistake into an intentional design element — a too-dark line becomes deliberate shading, an over-burned patch becomes texture. This new idea took off several years later and eventually evolved into the mixed-media approach enthusiasts know and practice today. That’s not surrender. That’s improvisation.
If the wood is genuinely ruined — burned through, structurally spongy, beyond reasonable repair — accept it. Move to the next blank. Starting fresh beats spending three hours on something that’s fundamentally broken.
Every pyrographer over-burns something eventually. The ones who keep improving are the ones who dial back, run a test burn on scrap, and remember exactly how that mistake felt the next time they pick up the pen. That’s what makes this craft endearing to us hobbyists — it keeps you honest.

Stay in the loop
Get the latest classic custom wood furniture updates delivered to your inbox.