“`html
Wood Finish Peeling Off Stained Surfaces — Why It Happens
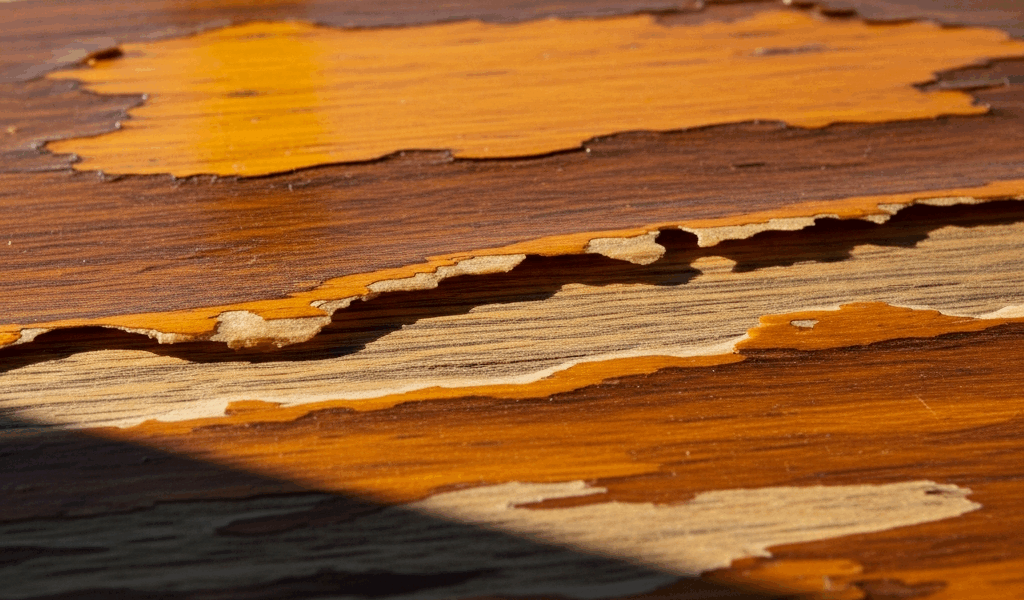
I discovered the hard way that wood finish peeling off stained surfaces isn’t random bad luck—it’s almost always a chemical incompatibility, moisture issue, or prep failure trying to tell you something. After refinishing my dining table with what I thought was a foolproof combination of gel stain and water-based polyurethane, I watched the finish separate in sheets within three weeks. That disaster taught me there are exactly five root causes, and once you identify yours, the fix becomes straightforward instead of guesswork.
Here’s what I learned by talking to a professional finisher and redoing that table twice.
Why Finish Peels Off Stained Wood
Incompatible stain-to-finish combinations are the most common culprit. Oil-based stains contain solvents that can remain on the wood surface, and when you apply water-based polyurethane over them, the poly can’t bond properly. I made exactly this mistake — used a Minwax oil-based gel stain, then applied Varathane water-based poly thinking any finish worked with any stain. It doesn’t work that way.
Moisture trapped beneath the finish causes peeling that typically appears in clusters or bubbles. This happens when you apply finish over damp wood or when humidity spikes during application. The trapped moisture expands and creates pressure that pushes the finish away from the wood surface. That pressure keeps building until something gives.
Incomplete sanding before staining leaves dust, old finish residue, or a slick surface that prevents stain adhesion. If the stain doesn’t bond evenly to the wood, the finish on top of that stain won’t bond either. You end up with a weak foundation — the stain itself can peel along with the topcoat.
Mixing incompatible stain products causes adhesion failure that appears days or weeks later. Blending two brands of oil-based stain or adding water-based toner to oil-based stain creates solvency issues the finish can’t overcome. The stain layer becomes unstable, and the finish peels. It’s chemistry working against you.
Grain raise not addressed creates a fuzzy surface that looks sealed but isn’t truly smooth. When you apply stain to raised grain, the finish sits on top of microscopic fuzz instead of bonded wood. It peels more easily under any stress. This is especially noticeable on open-grain woods like oak or ash — those big pores raise grain if you’re not careful.
How to Diagnose Which Problem You Have
You can narrow down your cause in about two minutes with these questions.
- How is it peeling? Finish peeling in large sheets or chunks suggests incompatibility or poor prep. Small flakes or bubbles point to moisture. Peeling that starts at edges or joints hints at grain raise or humidity expansion — pay attention to the pattern.
- Where is it peeling? High-traffic areas like countertops or table edges peel first when adhesion is weak. Random clusters suggest moisture. Consistent peeling across the whole surface points to stain-finish mismatch.
- Can you lift it? If you can peel the finish with your fingernail easily, adhesion failed. If it’s truly bonded and only flaking under extreme stress, you might have a different issue like water damage.
- Does the stain feel tacky? Run your finger under the peeled area. Tacky or oily stain means it didn’t cure properly, or it’s incompatible with the finish you applied. Dry, hard stain under the peeling suggests moisture or grain raise was the issue — very different problems.
- Did you sand between coats? If you didn’t sand the stain before applying finish, the slick, dust-covered stain surface prevented bonding. This is prep failure.
Probably should have opened with this section, honestly — it would have saved me from assuming I knew what went wrong before I actually tested.
Fixing Peeling Finish on Oil-Based Stain
If you stained with oil-based product and used water-based polyurethane, the finish is fighting chemistry it can’t win against.
Step 1: Remove the peeling finish. You don’t need to strip the entire surface. Use 150-grit sandpaper and sand only the areas where finish is peeling or lifting. Sand until you reach bonded finish or bare stain. This takes 20–40 minutes for a tabletop depending on coverage.
Step 2: Wipe with the correct solvent. Since the original stain is oil-based, wipe the sanded areas with mineral spirits on a clean cloth. This removes residual water-based poly particles and dust. Let it dry 15 minutes — don’t skip this step.
Step 3: Apply oil-based polyurethane. Use Minwax Helmsman or Varathane oil-based poly at full strength — don’t thin it. Apply thin coats with a foam brush or quality bristle brush. Drying time is 4–6 hours between coats at 70°F. You need two coats minimum for adequate protection.
Why water-based didn’t work: Water-based poly relies on surface tension to wet the wood and bond. Oil-based stain has different surface chemistry, and the poly sits on top instead of integrating. The oil-based finish cures through oxidation and handles this chemistry mismatch perfectly. That’s why your project needs matching chemistry in the first place.
Drying time for full cure is 7–10 days before heavy use. Yes, it’s longer than water-based. Worth it for adhesion that actually holds.
Fixing Peeling Finish When Moisture Is Trapped
Moisture damage has a distinct signature: the finish bubbles or peels in clusters, the wood underneath feels soft or spongy, and the stain may look darker in those areas.
Step 1: Sand off the finish and assess damage. Use 120-grit sandpaper and remove all peeling finish and any finish that feels soft. If the wood is visibly dark or soft after sanding, moisture penetrated deep. You’ll need to let it dry longer before recoating.
Step 2: Dry the wood completely. Leave the piece in a warm, dry space (65–75°F, below 40% humidity) for at least 48 hours. A dehumidifier speeds this up. For thicker wood like table aprons, give it 72 hours.
Step 3: Check moisture content. A basic moisture meter costs $20–$40 — I use a Lignomat model that’s been reliable for three years. Wood should be below 12% moisture before you recoat. If it’s 13–15%, wait longer. Above 15% means you need stronger drying — open windows, run a fan, use a dehumidifier.
Step 4: Reapply finish. Once moisture is under 12%, sand the dried wood lightly with 150-grit to remove any raised grain, then apply your finish. One coat is often enough to seal the small repair area.
Why moisture causes peeling: Water expands the wood fibers and creates pressure under the finish. As the wood dries again, it shrinks, and the finish — which doesn’t shrink — can’t stay attached. It’s simple physics.
When to Strip and Redo vs. Spot Repair
This is a practical decision that saves time or prevents worse problems.
Spot repair if peeling covers less than 30% of the surface. Sand off the peeling finish with 150-grit paper and feather the edges — sand a gradual slope from bare wood back to undamaged finish so you can’t see a line. Wipe with a tack cloth. Apply one coat of finish that matches your original (same brand, same type). Drying time is 4–6 hours. This works especially well on table edges, chair rails, or localized problem areas. Total repair time: 1–2 hours.
Full strip and refinish if peeling covers more than 30% of the surface. Feathering multiple repair spots becomes visible and looks patchy. Stripping the entire piece and starting fresh takes longer — 6–8 hours for a table including sanding and two finish coats — but the result is uniform and professional. You’ll also catch any underlying moisture or prep issues you might have missed on localized repairs.
For stripping, use 80-grit paper to remove all stain and finish, then progress to 150-grit for the final smooth surface. A random orbital sander cuts this time in half if you own one.
How to Prevent Peeling on Your Next Project
- Match stain and finish chemically. Oil-based stain + oil-based finish. Water-based stain + water-based finish. Don’t mix types. Check the can labels — the solvent type is always listed.
- Sand between coats. Even if the stain feels dry, sand it with 150-grit before applying finish. You’re creating a bonding surface, not a slick one.
- Test on scrap wood first. Apply your stain and finish combo on a matching piece of wood and let it cure fully. I now do this for every project — it catches incompatibilities before they damage your actual piece.
- Control humidity during application. Work between 40–60% relative humidity. High humidity slows drying and traps moisture. Low humidity (below 30%) can cause finish to cure too fast and crack.
- Cure fully before use. Water-based poly needs 7 days. Oil-based needs 7–10 days. Hard coat =/= cured. The finish continues hardening for weeks.
Once you understand that finish peeling is a symptom — not a random failure — you can fix the actual problem instead of just sanding and hoping. That dining table I ruined twice now has finish that’s held for three years because I finally matched the chemistry correctly and let moisture dry out before refinishing.
“`

Stay in the loop
Get the latest classic custom wood furniture updates delivered to your inbox.