Why Grit Order Actually Matters More Than Grit Choice
Sanding has gotten complicated with all the conflicting advice flying around. Everyone argues about which grit to buy, which brand of sandpaper holds up longest, whether you need a random-orbit sander or a belt sander — and meanwhile, nobody’s talking about the thing that actually ruins finishes. The order you sand in. That’s it. That’s the whole problem.
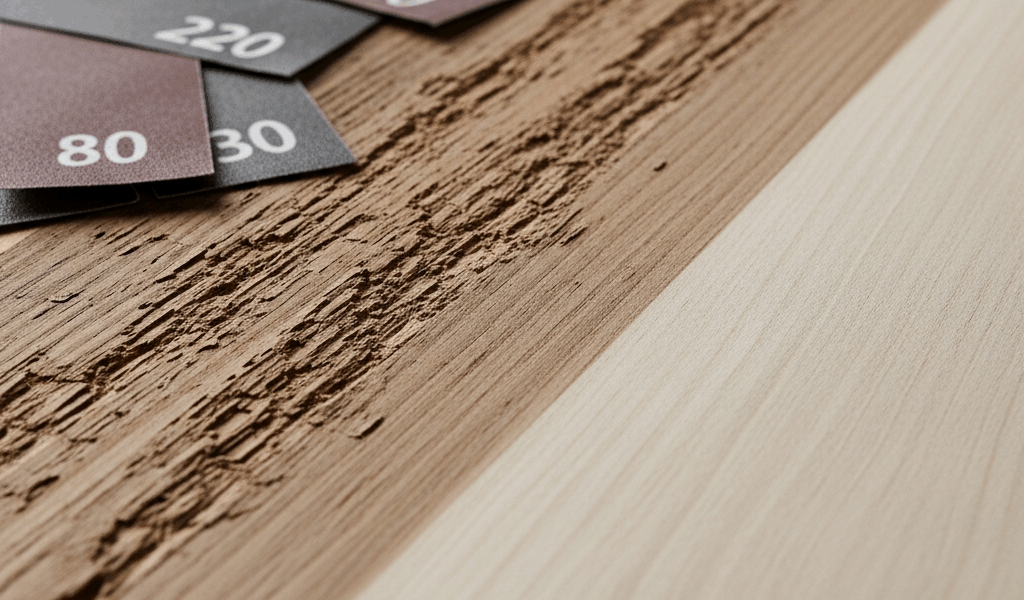
I learned this the hard way last spring on a walnut dresser. Spent an entire Saturday on it. Applied the stain, stepped back, and watched deep parallel scratches appear across every single drawer front — scratches I’d never once noticed on the raw wood. Turned out I’d jumped from 80-grit straight to 150-grit on the curved sections. The 80-grit scratches were still there the whole time. Just hiding.
But what is grit sequencing, really? In essence, it’s the practice of moving through progressively finer grits so each pass erases the scratch pattern left by the last one. But it’s much more than that — it’s the difference between a finish that looks like furniture and one you cover with a throw blanket. Each grit level has to address what came before it. Skip one, and you leave scratches too deep for the next grit to touch. They sit there, invisible in raw wood, waiting for stain to expose them.
Think of it like erasing pencil marks with the wrong eraser. A thick one leaves thick marks. A thin one can’t remove those — it’s only equipped for its own scale of mess. You have to work through the sizes. Same physics. No shortcuts.
Most articles hand you a grit chart. They don’t tell you what breaks when you ignore it. Today, I’ll share everything I know about fixing it — and avoiding it entirely.
Signs You Used the Wrong Grit Sequence
Probably should have opened with this section, honestly. Recognizing the mistake early saves you from finishing over it and starting completely from scratch.
- Deep parallel scratches visible under finish or stain — These run in one direction and don’t blur or soften under a coat of finish. They sharpen, actually. That’s the classic sign you skipped a medium grit — probably jumped from 80 straight to 150.
- Uneven stain absorption across the board — Some sections pull in stain darker than others. Blotchy, inconsistent, almost random-looking. This usually means you stopped sanding too early in spots, or went too fine in others and closed the grain unevenly.
- Raised grain that won’t quit after the first coat — You sanded to 120-grit, applied stain, and now the surface feels like fine stubble under your fingers. You didn’t finish the pre-stain sequence. The grain lifted when moisture hit it and there wasn’t enough prep work to prevent it.
- Surface looks dull or cloudy in raking light — Grab a flashlight. Hold it at a shallow angle — maybe 10 or 15 degrees off the surface. If you see grooves running parallel across the wood, that’s the wrong grit pattern reflecting back at you. Finer grits eliminate this entirely.
Correct Grit Sequences for Common Wood Projects
Rough Lumber or Reclaimed Wood
Start at 60 or 80-grit. Seriously — even 60. Rough stock comes with milling marks, embedded dirt, and occasionally rust staining that won’t budge at 100-grit no matter how long you work it. I’m apparently stubborn about this and learned it on a barn beam project. Started at 100, spent three hours, went nowhere. Dropped to 60-grit and the surface came clean in twenty minutes. Don’t make my mistake.
Progress like this: 60 → 80 → 120 → 150 → 180. Stop at 180 unless you’re painting the piece. For stain, 180 is the right endpoint — going finer closes the grain and cuts your color absorption significantly.
Hardwood Furniture and Cabinet Parts
Most hardwood arrives from the mill already at roughly 80 or 100-grit rough. Start at 100 and follow this sequence: 100 → 120 → 150 → 180 → 220. That’s the standard for anything getting stain or clear coat. The 220-grit final pass removes the last of the 150-grit scratches and leaves a surface that’s genuinely silky — the kind of surface where finish almost seems to apply itself.
Dense hardwoods like oak or hard maple can stop at 180 before staining. The grain is tight enough to resist blotching on its own. Softer hardwoods — cherry, walnut, even some open-grained species — benefit from running the full sequence to 220. That extra pass matters more than it sounds.
Softwood Furniture and Paint Prep
Pine and fir sand fast. Too fast, sometimes — easy to over-sand and easy to scratch. Start at 100 and let the finish type tell you where to stop. Painting? Stop at 150. Paint fills minor surface variations, and anything finer is genuinely wasted time.
Sequence for paint: 100 → 120 → 150. Done. For stain, pine needs more respect — it blotches badly without proper prep. Run the full sequence: 100 → 120 → 150 → 180 → 220. Those last two steps are doing real work on softwood.
Pre-Stain and Pre-Finish Prep
Here’s something counterintuitive that took me a while to actually believe: going too fine before staining works against you. Ultra-fine grits — 320 and above — burnish the wood surface closed. The pores seal. Stain sits on top instead of penetrating, and you end up with a surface that behaves like it’s already been sealed, except it hasn’t, and it looks awful.
Your final grit before staining should be 150, 180, or 220 depending on the wood species and what finish you’re applying after. Do not exceed 220 before staining. The sequence looks like this: work grits first, then 150 or 180 as your stopping point. Apply stain. If grain raised slightly, one light 220-grit pass before topcoat puts things right.
How to Fix a Board You Already Sanded Wrong
Caught mid-project with visible scratches under finish? Backtrack. There’s no shortcut here — but there is a right way to do it.
First, identify the deepest scratch pattern. Hold the board under a single light source and look for parallel lines. Their spacing and width tell you roughly which grit left them. Scratches about the width of a human hair, closely packed together — that’s probably 100-grit or coarser. Finer lines that almost disappear without direct light — that’s closer to 150-grit territory.
Once you’ve identified the culprit, drop back one grit level below it. If 80-grit scratches are still present, re-sand the entire surface starting at 60 or 80. The entire surface — not just the visible area. Spot-sanding a single patch almost never works. You change the surface texture in that zone only, and it shows. The patched area reads as a shiny or flat spot against the surrounding wood. It’s obvious and it’s worse than the original problem.
Expect to add somewhere between 30 and 45 minutes to your project, depending on board size and how far back you need to go. A 24″ × 36″ tabletop that needs resetting to 80-grit and progressing all the way forward will eat most of an afternoon — even with a Makita BO5041 or similar random-orbit sander running the whole time. Hand sanding takes considerably longer and produces less consistent pressure across the surface.
While you won’t need a full shop’s worth of equipment, you will need a handful of tools that make this work actually manageable. A random-orbit sander might be the best option here, as fixing grit sequence errors requires consistent pressure across a large area. That is because uneven hand pressure creates subtle dips and ridges that only show up once finish is applied — exactly the kind of problem you’re already trying to solve.
Quick Reference — Grit Sequence by Project Type
- Rough-sawn lumber: 60 → 80 → 120 → 150 → 180
- Hardwood furniture (walnut, cherry, maple): 100 → 120 → 150 → 180 → 220
- Softwood furniture (pine, fir) for paint: 100 → 120 → 150
- Softwood furniture (pine, fir) for stain: 100 → 120 → 150 → 180 → 220
- Pre-stain final prep: Stop at 150, 180, or 220 depending on species. Do not go past 220.
- Pre-paint final prep: 100 → 120 → 150. Paint handles the rest.
- Post-stain before topcoat: Light 220-grit pass only if grain raised. Otherwise go straight to finish.
Bookmark this. Screenshot it. Tape it to the wall above your sanding station — I mean that literally. The gap between a finish that looks professional and one you quietly hide comes down to grit sequence discipline. Not the brand of sandpaper. Not the price of your sander. The order. That’s what makes this so endlessly frustrating to those of us who learned it the wrong way first. It costs nothing to get right and costs an entire Saturday to get wrong.

Stay in the loop
Get the latest classic custom wood furniture updates delivered to your inbox.