Why Pocket Holes Split Wood in the First Place
Pocket hole joinery has gotten complicated with all the misinformation flying around. Bad jigs, bad technique, bad lumber — people blame everything except the one thing sitting right in front of them: the screw box.
I’ve been building furniture since my early twenties, and I learned everything there is to know about pocket hole splits the worst possible way. Today, I’ll share it all with you.
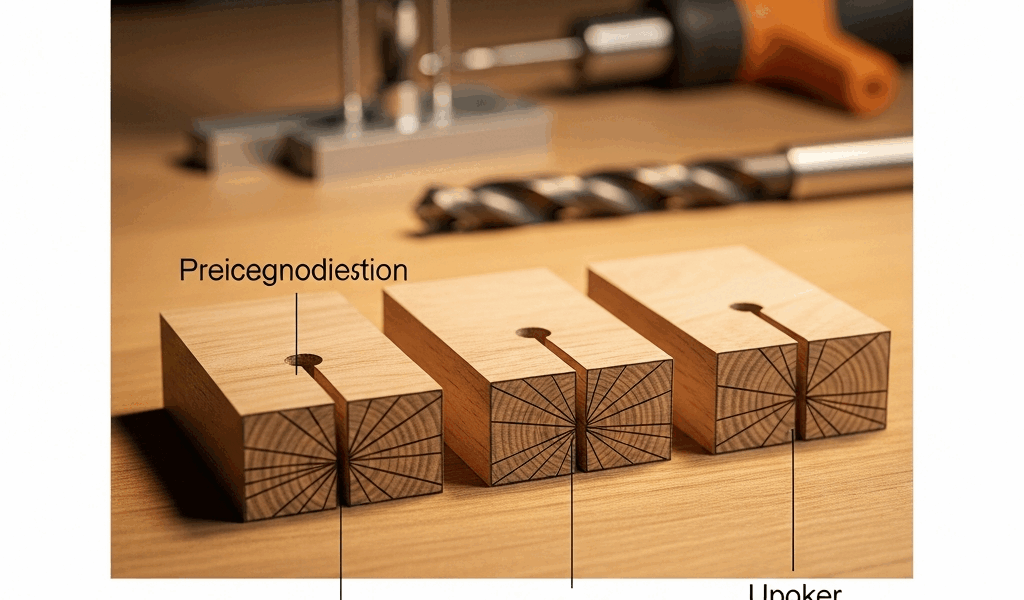
What you’re actually looking at when a pocket hole splits isn’t a loose joint or a failed glue line. It’s real fractures — radiating outward from where the screw sits, usually tracking parallel to the grain. I watched this happen in slow motion on a 3/4-inch walnut panel once. The joint looked bulletproof. Then I moved the piece. Infuriating doesn’t cover it.
The root cause is almost always one of three things: wrong screw diameter for your material thickness, drilling too close to the edge, or skipping a pilot hole on hardwood. That’s it. Three things. And most people spend twenty minutes blaming their Kreg jig when the answer is literally printed on a chart inside the packaging they threw away.
Hardwood is a completely different animal than pine or poplar. Oak and maple especially. The grain is denser, more rigid — a screw that grips beautifully in softwood will shatter the fibers in hardwood if you don’t adjust your approach. Probably should have opened with this section, honestly. This single material difference is the trap I see over and over, even from experienced builders who know better.
Think of the screw as a wedge. Drive a fastener into wood and you’re pushing fibers apart. Softwood has some give — those fibers flex and close back around the threads. Hardwood doesn’t negotiate. Add a screw that’s too coarse or too thick for your workpiece, and the pressure concentrates in a tiny area. The wood loses every time.
Wrong Screw Size Is Usually the Culprit
I learned this the hard way on a maple desk I built in 2019. Grabbed coarse-thread 1.5-inch Kreg pocket hole screws — the blue-label ones, standard stuff — and drove them into 5/8-inch maple sides without once opening the screw chart. Three joints split within a week. Stupidly simple mistake with a real material cost.
Don’t make my mistake.
Coarse-thread screws exist for softwood and engineered sheet goods. They bite fast and seat aggressively. That aggressiveness is the problem in hardwood — the threads are spaced wider, which means more material displacement per rotation. In oak or maple, fine-thread screws are what you need. Tighter spacing. Less pressure per turn. Instead of forcing fibers apart, the screw actually pulls them together.
Here’s a working reference for standard thicknesses:
- Softwood (pine, poplar, fir) up to 3/4 inch — 1.5-inch coarse-thread, #8 or #10 diameter
- Hardwood (oak, maple, walnut) up to 3/4 inch — 1.5-inch fine-thread, #8 diameter
- Softwood 7/8 to 1 1/4 inch — 2.5-inch coarse-thread
- Hardwood 7/8 to 1 1/4 inch — 2.5-inch fine-thread, #8 diameter
Drive a coarse-thread #10 into 5/8-inch oak and you’re essentially hammering a wedge 1.5 inches deep into unusually dense fibers. The joint holds initially — sometimes for weeks. Then the wood moves with seasonal humidity. The split opens. You find the fissure running from the hole straight toward the edge like a crack in pavement.
Fine-thread screws also pull out cleaner at the pocket entrance. Less tear-out means fewer weak spots where a split can get started. Small detail. Big difference over time.
Drill Bit and Jig Setup Mistakes That Cause Splits
Your Kreg jig — or whatever equivalent you’re running — has adjustment collars for different material thicknesses. 3/4 inch, 1/2 inch, 1 1/4 inch. These aren’t decorative. They control how deep the step bit drills and where the screw bottoms out relative to the face.
Set the collar for 3/4 inch and use it on a 1/2-inch board and you’ve drilled too deep. The screw compresses wood that’s thinner than expected. You get blowout on the exit face and stress fractures fanning out from the hole. I did this once with red oak veneer plywood — half-inch material, wrong collar, full speed ahead. Splinters erupted out the other side. Panel was ruined.
The fix is embarrassingly simple: measure your actual material thickness before you touch the jig. Not “it looks like 3/4 inch.” Measure it. Calipers are faster than a tape measure here — a decent set runs about $15 at Harbor Freight. Then set the collar accordingly. That’s the whole fix.
A dull step bit causes more splitting than most people ever suspect. Instead of cutting cleanly through the wood fibers, a worn bit tears and pulls them — leaving micro-fractures around the hole before the screw even enters. When the threads engage, those micro-fractures become the starting point for something much worse. Replace the bit after 50 to 60 holes depending on how hard your material is. A fresh bit is $12. A ruined hardwood workpiece costs your afternoon, your lumber money, and a good chunk of your patience.
Jig collar position matters on thin stock too. Position it too far from the surface and the board won’t clamp tight. It lifts slightly as you drill. The pocket goes shallow. The screw runs out of engagement length and starts relying entirely on fiber tension to stay put — which in hardwood means the fibers split instead of hold.
Press the jig collar down flat and firm. You should feel real resistance. If it clamps easily, give the collar another half-turn.
How to Fix a Board That Already Split
If you’re reading this with a cracked panel sitting in front of you right now, here’s the honest path forward.
Hairline splits at pocket holes are repairable. Remove the screw first — don’t try to work around it. Mix up some epoxy or polyurethane wood glue and work it into the crack with a thin palette knife or a stiff wire. Clamp the board flat for a full 24 hours. The glue fills the void and re-bonds the fibers. Once it’s cured, you can re-drive the same screw. This works on roughly 80% of splits caught early enough.
Cyanoacrylate glue — CA glue, super glue, whatever you call it — is faster for hairline cracks specifically in hardwood. It wicks into narrow gaps almost instantly. No clamping needed. But it won’t fill anything wider than a sheet of paper, so it’s a cosmetic fix more than a structural one on anything larger than a true hairline.
Wide splits — anything over 1/16 inch — are a different conversation. Glue won’t restore full structural integrity. The wood is already compromised at that location. You can glue it, clamp it, let it cure — and then driving a screw through that same joint again is almost guaranteed to re-open the old split line. Stress remembers where to go.
Honestly, when a split is wider than 1/8 inch, cut a new piece. You’ll spend less time and less frustration than nursing a repair that probably won’t hold under real load anyway.
How to Prevent It on Your Next Joint
Here’s the checklist in order of actual importance:
- Measure your actual material thickness. Write it down on the board in pencil if you have to. Don’t guess.
- Set the jig collar to that exact thickness before drilling anything.
- Choose fine-thread screws for hardwood, coarse-thread for softwood. Not interchangeable.
- Match screw diameter to your thickness range — see the reference table above.
- Replace your step bit when it starts pulling instead of cutting. Don’t wait for obvious dullness. You’ll feel the difference.
- Pre-drill a pilot hole in hardwood before the pocket hole. A 1/16-inch bit is enough. Takes ten seconds per hole and saves the joint.
- Don’t over-drive the screw. Flush with the pocket is the target. One extra turn is one turn too many — at least if you’re working with anything denser than poplar.
That’s what makes pocket hole joinery endearing to us woodworkers — it’s genuinely simple once you understand the three variables that matter. Material, collar setting, screw type. Get those right and the joint holds.
The number one prevention step most people skip is checking material thickness before touching the jig. It sounds basic. It is basic. That’s exactly why it gets skipped. But it’s behind 90% of the pocket hole splits that have shown up on my bench over the years.
Thirty seconds with a caliper. That’s the whole investment. Measure, set the jig, verify the screw, drive it flush. The joint will hold.


Stay in the loop
Get the latest classic custom wood furniture updates delivered to your inbox.