
You just finished a pass with the router and there are dark brown scorch marks all over your workpiece. The wood smells like a campfire. Before you blame the bit or the router, the fix is almost always simpler than you think — and nine times out of ten, it comes down to how fast you’re moving.
This article includes affiliate links. We may earn a commission at no extra cost to you.
The Most Common Cause — You’re Feeding Too Slow
This accounts for the majority of router burning problems. The bit is spinning at thousands of RPM, and every millisecond it sits in one spot, friction builds heat. Move the router too slowly and that heat has nowhere to go except into the wood. The result is those ugly dark streaks that no amount of sanding wants to come out.
Here’s a quick way to know if feed rate is your issue. After a pass, touch the cut surface with the back of your hand (carefully — don’t grab it). If the wood feels warm or hot, you were moving too slow. On a properly fed cut, the wood should feel cool or barely room temperature. The chips should be coming off as small flakes, not fine powder. Powder means the bit is rubbing more than cutting.
The tricky part is that “too slow” varies by wood species, bit diameter, and depth of cut. There’s no single magic speed. But as a starting point, try moving about 50% faster than feels comfortable on a scrap piece. Most people instinctively feed too slowly because they’re worried about tearout. You’re better off making two lighter passes at a brisk pace than one deep pass at a crawl.
On a router table, the temptation to slow down is even stronger because your hands are close to a spinning bit. Practice with scrap until you find a rhythm that feels confident. A steady, deliberate push beats a hesitant, stop-and-start creep every time.
RPM Settings by Bit Diameter
This is the one most people skip, and it causes a huge percentage of burning — especially with larger bits. A small 1/4-inch straight bit can safely run at max RPM on most routers. A 2-1/2 inch raised panel bit at that same speed is a disaster waiting to happen. The edge of a large bit is traveling much faster than the edge of a small one at the same RPM, and that extra speed generates significantly more friction heat.
Use these as starting points and adjust from there:
Bit diameter → Maximum RPM:
- Up to 1 inch: 24,000 RPM
- 1 to 1-1/4 inch: 22,000 RPM
- 1-1/4 to 1-1/2 inch: 18,000 RPM
- 1-1/2 to 2 inches: 16,000 RPM
- 2 to 2-1/2 inches: 14,000 RPM
- Over 2-1/2 inches: 12,000 RPM or less
Most variable-speed routers have a numbered dial from 1 to 6, not an actual RPM readout. Check your router’s manual for what each number corresponds to. On my Bosch 1617, dial position 1 is about 8,000 RPM and position 6 is around 25,000. A lot of people just leave it on 6 for everything and wonder why their large profile bits burn cherry like it’s tinder.
When in doubt, start lower. You can always bump the speed up if the cut feels rough or chattery. But if you start too high and scorch the wood, that burn mark is permanent — it’s not just on the surface, it penetrates into the grain.
Wood Species That Burn Easiest
Not all wood burns the same. Some species will punish you for even a momentary hesitation, while others are forgiving enough that you can practically stop mid-cut without a mark.
The worst offenders:
Cherry tops the list and it’s not even close. Cherry burns if you look at it wrong. The combination of its density, tight grain, and natural sugars means it scorches at lower temperatures than almost any other domestic hardwood. If you’re routing cherry, everything has to be dialed in — sharp bit, correct RPM, steady feed rate, shallow passes. There is no margin for error.
Hard maple is a close second. It’s dense enough that heat builds fast, and the light color makes every scorch mark painfully obvious. Birdseye and curly maple are even worse because the interlocked grain creates more resistance and friction.
Exotic hardwoods — purpleheart, padauk, and bloodwood are all burn-prone. Their extreme density means more friction per revolution. Purpleheart has the added annoyance of turning brown when it burns, which defeats the whole purpose of using a purple wood.
The forgiving ones:
Oak and walnut are relatively burn-resistant. Their open grain structure dissipates heat better, and the darker color of walnut hides minor scorch marks anyway. Red oak is more forgiving than white oak because of its larger pores.
Pine and other softwoods almost never burn. They’ll tear, fuzz, and splinter before they scorch. If you’re getting burn marks on pine, something is seriously wrong — like a completely dead bit or a router running at full speed with the bit barely touching the wood.
Knowing your wood helps you decide how cautious to be before you even turn the router on. Cherry project? Slow down the RPM, sharpen or change the bit, and have a test piece of the same species ready for dialing in your settings.
Dull Bits and Pitch Buildup — How to Tell
A dull bit burns wood even when your feed rate and RPM are correct. The cutting edge isn’t slicing cleanly anymore — it’s rubbing and generating friction instead of shearing fibers. The frustrating part is that bits go dull gradually, so the burning creeps in over weeks or months and you might not connect it to the bit.
Here’s the test: take that bit, set up a fresh piece of cherry at the correct RPM and feed rate, and make a pass. If it still burns cherry when everything else is right, the bit is dull. Cherry is the canary in the coal mine for bit sharpness — it’ll show you the truth faster than any other species.
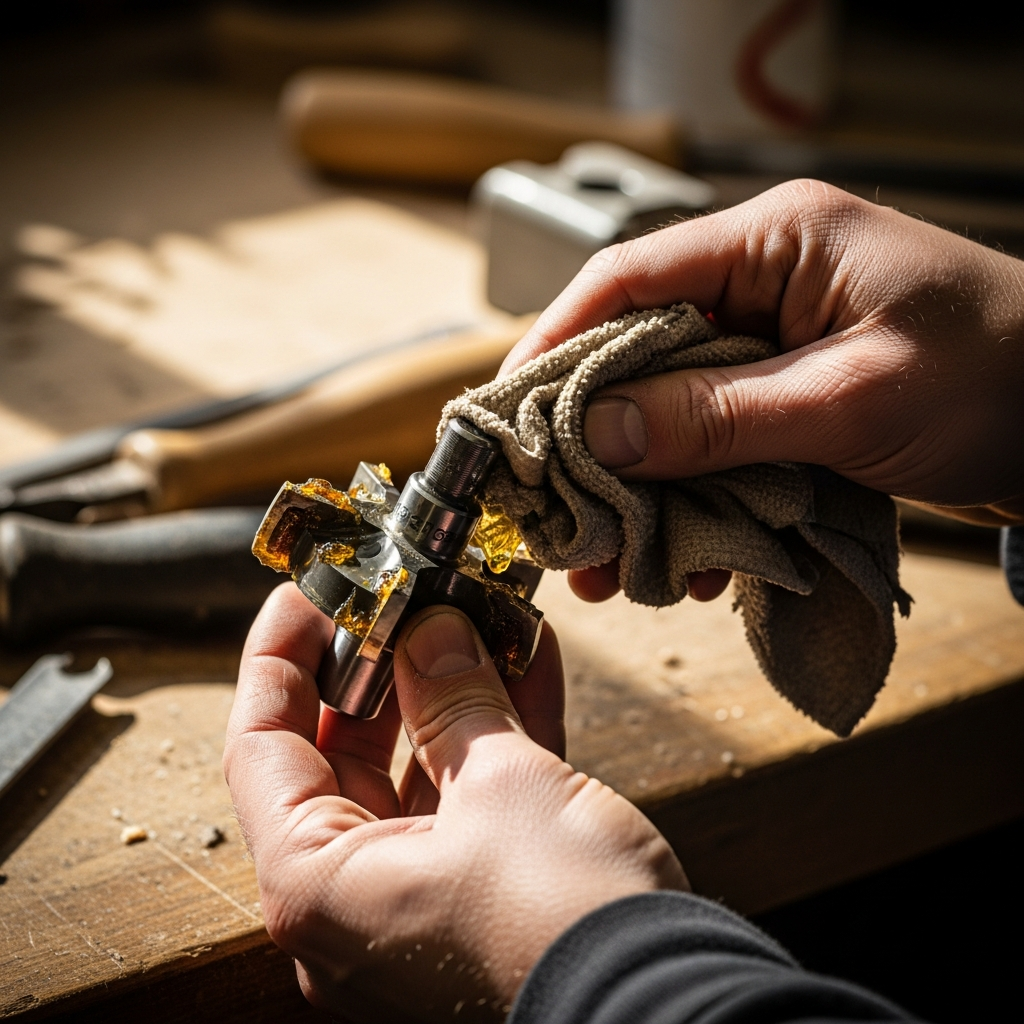
Before you toss the bit, though, check for pitch buildup. Look at the cutting edges closely. See that amber or brownish coating on the carbide? That’s baked-on wood resin, and it effectively makes the cutting edge thicker and duller than it actually is. A coated bit cuts like a dull bit even if the carbide underneath is still sharp.
Cleaning is easy. Spray the bit with oven cleaner — the kind with lye — and let it soak for 15 minutes. The pitch dissolves right off. Rinse with water and dry immediately to prevent flash rust on any steel parts. If you prefer something less aggressive, CMT Formula 2050 is made specifically for router bits and saw blades. Either way, clean your bits after every few projects. It takes two minutes and extends their useful life significantly.
When the bit is genuinely dull, you have two options. Carbide-tipped bits are worth resharpening — a sharpening service runs $5 to $15 per bit and gives you essentially a new cutting edge. HSS (high-speed steel) bits are generally not worth the trouble. They’re cheap enough to replace, and they dull faster than carbide anyway. A good carbide spiral bit might cost $25 to $40, but it’ll last through dozens of sharpenings.
Removing Burn Marks After the Fact
Prevention is better, but if you’ve already got scorch marks on a piece, here are your options — ranked from least to most aggressive.
Light surface burns: Start with 150-grit sandpaper and work with the grain. Most surface-level scorch marks come out within a few passes. Move to 220-grit once the dark color is gone to smooth the surface back out. The key is sanding with the grain — cross-grain sanding scratches will show up under finish just as badly as the burn marks did.
Deeper burns on routed profiles: Sanding a curved profile is a pain and you’ll likely round over the crisp edges the router was supposed to create. A better approach is to take one more very light pass with the router — set the depth to remove about 1/32 of an inch of material. This time, use the correct RPM and move briskly. The fresh cut removes the burned layer and leaves a clean surface underneath.
Burns on flat surfaces: A card scraper is your best friend here. A sharp scraper removes material in thin, controlled shavings and leaves a glass-smooth surface behind. It’s more precise than sanding and won’t round over edges. If you don’t own a card scraper yet, this is a good excuse to pick one up — they’re $10 and endlessly useful.
One thing to avoid: don’t try to bleach out burn marks with wood bleach or oxalic acid. It might lighten the color, but the burned fibers absorb stain and finish differently than the surrounding wood. You’ll end up with a blotchy, uneven finish that looks worse than the original burn. Remove the burned material physically — sanding, scraping, or re-routing — rather than trying to chemically disguise it.
Stay in the loop
Get the latest classic custom wood furniture updates delivered to your inbox.