Why Wood Filler Fails to Bond in the First Place
Wood filler has gotten complicated with all the conflicting advice flying around. As someone who has spent the last eight years doing furniture restoration and cabinet repair, I learned everything there is to know about why filler fails — and how to actually fix it. Today, I will share it all with you.
I’ve scraped out failed filler more times than I’d like to admit. You fill a hole, wait for it to dry, sand it flush, and then watch it pop right back out the moment you brush on finish. Maddening doesn’t cover it.
But what is a filler failure, really? In essence, it’s a mismatch — between your surface, your product, or your method. But it’s much more than that. It’s almost always preventable once you know which of the four common failure points is working against you. That’s what makes this fixable for us woodworkers and restoration folks who just want a clean repair.
Dirty or Oily Surface Preventing Adhesion
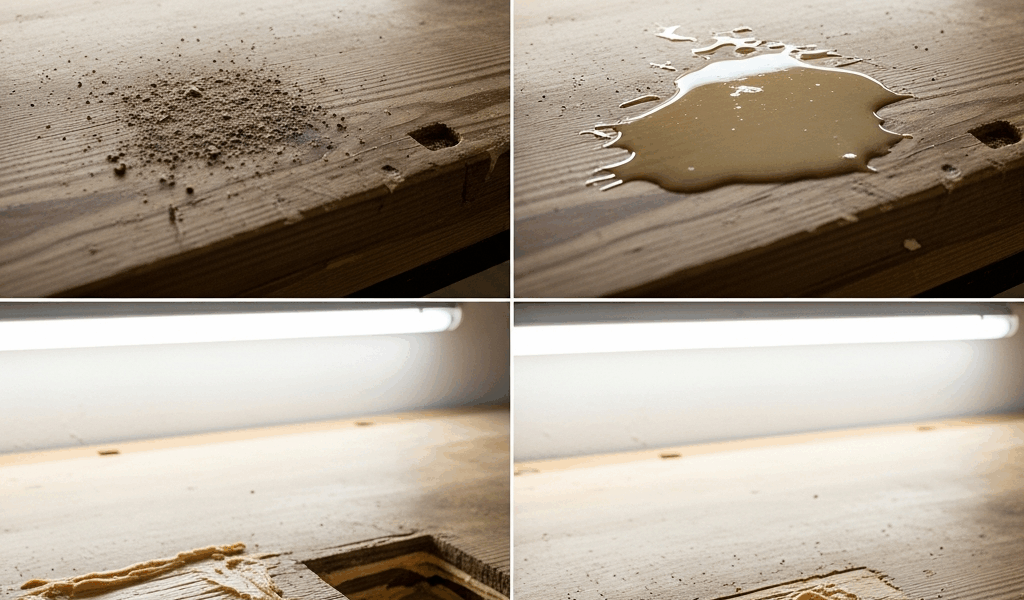
This is the culprit in roughly 60% of cases I’ve seen. A dirty cavity. Full stop.
When you drill out a hole or chisel damaged wood, you leave sawdust, chips, and fine powder behind. That dust acts like a release layer between the filler and the actual wood fibers. Filler needs direct wood contact. Anything in between kills that bond fast.
Dust is only half the problem, though. Some species — teak, rosewood, a few others — push natural oils to the surface constantly. Previously stained or sealed wood leaves residue coating the cavity walls. I once spent a full hour trying to get filler to stick to a mahogany dresser before I realized it had been treated with Danish oil at some point. The whole interior surface felt like a skating rink. Don’t make my mistake.
How to diagnose it
Look inside the cavity. Dust visible? Does the surface look wet or slightly shiny? Run a finger along the interior edge — if it comes away gray or slick, that’s your problem right there.
The fix
Clean the cavity before you touch the filler. Here’s my actual process:
- Blow out loose sawdust with compressed air or a hand pump. A $12 electric duster from any hardware store handles this fine.
- Wipe the cavity walls with a cloth dampened in denatured alcohol. Let it sit — five minutes, usually.
- For stubborn oil residue, wrap 120-grit paper around your finger and lightly scuff just the interior walls. Blow out again afterward.
- If the cavity still looks dark or stained, one more alcohol wipe and you’re done.
Three minutes total. Eliminates about 90% of adhesion problems right there.
Using the Wrong Type of Filler for the Job
Water-based, solvent-based, and epoxy fillers behave in completely different ways. So, without further ado, let’s dive in — because picking the wrong one means the cleanliness of your surface doesn’t matter at all.
Water-based fillers — Elmer’s Wood Filler, most big-box store options — are cheap and easy to find. They also shrink as they dry, sometimes 10–15%. Fine for shallow nail holes. For anything deeper than a quarter-inch, they pull away from the edges as they cure. Exterior work? Forget it. Seasonal wood movement will push them out eventually.
Solvent-based fillers — Minwax High Performance Wood Filler is the one I keep on my shelf — shrink less and sand more predictably. They work well for interior repairs and surfaces getting a topcoat. The trade-off is real, though: stronger smell, slower dry time, and they can be tricky if you’re staining around the repair.
Epoxy fillers bond hard and shrink almost nothing. Perfect for structural repairs and exterior jobs. The catch? Rock-hard once cured. Wood still moves seasonally — all wood does — and epoxy doesn’t move with it. Eventually the bond fails, or you get a crack straight through the center of your repair.
How to diagnose it
Ask yourself a few things. Is the hole deep? Exterior or interior? Is the wood still moving, or is it in a climate-controlled space year-round? The answers tell you everything.
The fix: match your filler to your situation
- Small interior nail holes, stained finish: Solvent-based filler — Minwax or Aqua Coat both work. They take stain color far better than water-based options.
- Shallow defects under clear coat or paint: Water-based filler is fine here. The finish seals it and prevents moisture intrusion.
- Deep holes over a half-inch, or any exterior repair: Two-part epoxy, applied in layers with at least 24 hours between each pass. Letting wood movement happen gradually between layers matters.
- Moving wood or seasonal expansion concerns: Skip pure epoxy entirely. Go solvent-based in thin layers instead.
Applying Too Much at Once or Not Letting It Cure
Probably should have opened with this section, honestly. Impatience kills more filler repairs than anything else — more than dirty surfaces, more than wrong product choice.
Pack a deep cavity in one thick pass and moisture gets trapped inside. The surface cures while the interior stays wet. When that interior finally dries, it shrinks inward and pulls away from the edges. You end up with a crater where you wanted a flush repair. I’m apparently a slow learner on this one — and filling over that crater with the same thick approach never works.
Thick applications also cause surface skinning. Hit it with a heat gun to speed things up and the outside hardens while the interior is still soft. Later, as the interior dries, it pulls the hardened skin down with it. Sand through that skin and you’ll hit spongy, uncured filler underneath. That was a rough Tuesday on a walnut sideboard I was refinishing for a client.
The fix
Apply filler in layers. For holes deeper than a quarter-inch, this isn’t optional — it’s just how it works.
- First layer: fill to roughly half the depth. Let it cure completely per manufacturer specs — usually 4–8 hours for solvent-based, a full 24 for epoxy.
- Second layer: bring it up to the surface or very slightly overfull. Let it cure again completely.
- Sand flush once it’s fully hardened. Not before.
For cavities over an inch deep, three thin layers beats one thick pass every single time. Yes, it takes longer. It also actually holds. No heat guns — let it cure at room temperature. Your impatience isn’t worth another scrape-out.
How to Fix Filler That Has Already Failed
If you’re staring at a failed repair right now, here’s the recovery process:
- Scrape out all the old filler. Flat chisel or putty knife — get back to bare wood on every interior surface.
- Run through the cleaning steps from the first section: compressed air, alcohol wipe, full dry time.
- Identify which failure point applied — dirty surface, wrong product, or application depth.
- Apply the correct filler the correct way.
Ten minutes if you already know the cause. Maybe fifteen if you’re being careful about it. That’s it.
One final note worth keeping in mind. End grain doesn’t hold filler reliably — the structure just doesn’t give the filler much to grip. Punky or rotted wood has no integrity for a bond to form against. And if your cavity sits inside an active crack that’s still moving, no filler product holds without addressing the underlying structural issue first. Those situations need wood replacement or epoxy consolidant stabilization before filler even enters the conversation.

Stay in the loop
Get the latest classic custom wood furniture updates delivered to your inbox.