Chisel sharpening has gotten complicated with all the jig systems, stone options, and scary-sharp methods flying around. As someone who sharpens chisels almost daily in my shop, I learned everything there is to know about stones, guides, and getting an edge that slices through hardwood like it is not even there. Today, I will share it all with you.
Why Sharpness Is Not Optional
Dull chisels are dangerous and useless. That is not an exaggeration. A dull chisel slips because it cannot bite into the wood. It tears fibers instead of slicing them. It demands so much force that when it finally breaks free, your hand goes wherever the chisel goes — which is sometimes into your other hand. I have the scar to prove it.
A sharp chisel slices through wood like butter. Clean shavings. Total control. Minimal effort. The difference between a sharp and dull chisel is night and day, and once you experience truly sharp, you will never go back to fighting your tools. That’s what makes chisel sharpening endearing to us hand tool woodworkers — it transforms a frustrating chore into a satisfying craft.
The Angle Setup
Probably should have led with this section, honestly. Understanding the geometry is the foundation of everything.
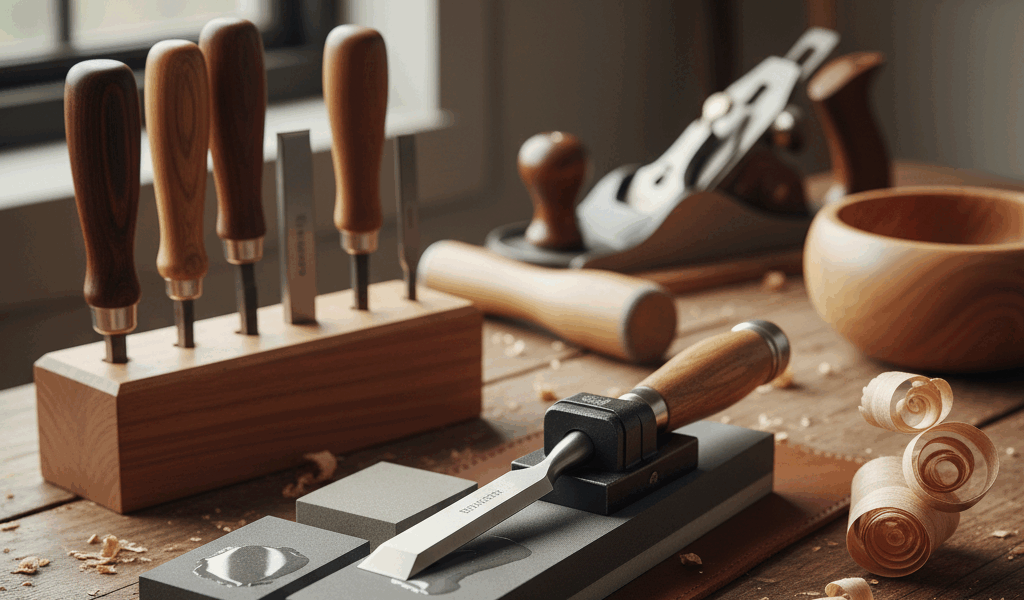
Primary bevel sits around twenty-five degrees. This is the main angle ground on the chisel. You set this at the grinder or on a coarse stone and it does not change often. Secondary bevel — also called the micro bevel — sits at about thirty degrees. This is the actual cutting edge, and it is what you hone every time you sharpen.
Do not obsess over hitting the exact angle. Consistency matters far more than precision. Whether your micro bevel is twenty-nine or thirty-one degrees does not matter. What matters is that you hold that same angle throughout the entire sharpening motion. A honing guide helps beginners stay consistent, and plenty of experienced woodworkers use them too. There is no shame in using a jig.
Sharpening Media — Picking Your System
Oilstones are the traditional choice. They cut slowly, which gives beginners more control, and produce very fine edges. You lubricate them with honing oil. Arkansas stones are the classic American oilstone. They last generations and are nearly indestructible. I have an old translucent Arkansas stone that belonged to my grandfather.
Waterstones cut faster and are my daily preference. Japanese waterstones in particular are excellent — a thousand grit for sharpening and an eight thousand grit for polishing gets you a mirror edge in minutes. The downside is that waterstones dish out from use and need regular flattening on a diamond plate or sandpaper. I flatten mine every few sharpenings.
Diamond plates stay perfectly flat forever, which is their biggest selling point. They are great for flattening the backs of new chisels and for initial rough grinding. I use a coarse diamond plate for flattening chisel backs and then move to waterstones for the final honing.
Sandpaper on glass — the scary-sharp method — is the budget option that genuinely works. Get a piece of thick plate glass, stick automotive wet-dry sandpaper to it, and you have a dead-flat sharpening surface. Start at two-twenty grit and work up to two thousand. The glass stays flat and the sandpaper is cheap to replace. I started with this method and it taught me the fundamentals before I invested in stones.
The Sharpening Process
Flatten the back first. Lay the chisel flat — dead flat — on your coarsest stone and work the back until it is a uniform polished surface near the cutting edge. Then refine through finer grits until it shines. This only needs doing once per chisel when it is new, but it absolutely must be flat. A chisel with a convex or hollow back will never get truly sharp because the edge geometry is compromised.
Bevel next. Establish the primary angle at twenty-five degrees, then hone the secondary micro bevel at thirty degrees. Work through grits from coarse to fine. Coarse stones remove metal and shape the edge. Fine stones polish and refine. The progression from rough to polished is what creates a keen cutting edge.
Testing and Maintaining the Edge
Shave end grain cleanly. If the chisel cuts clean, curling shavings from end grain, you are sharp. If it crumbles, tears, or requires force, keep going. I test on a scrap of pine end grain after every sharpening session.
Light reflection is another test. A truly sharp edge is so thin it does not reflect light. Tilt the edge under a bright light — any bright spots or lines indicate flat spots that need more work.
Strop between full sharpenings to extend the edge life. A piece of leather charged with honing compound keeps the edge keen for much longer between stone sessions. When stropping stops bringing the edge back, it is time for a full sharpening on the stones. Usually every few hours of active use.


Stay in the loop
Get the latest classic custom wood furniture updates delivered to your inbox.