Box joint jigs have gotten complicated with all the fancy commercial options and YouTube builds flying around. As someone who spent years cutting box joints the hard way before finally building a proper jig, I learned everything there is to know about getting those interlocking fingers to fit just right. Today, I will share it all with you.
What Makes a Box Joint So Appealing
There is something about a well-cut box joint that just stops people in their tracks. Those interlocking fingers visible on the corners of a box or drawer — they look like they took forever. And honestly, before I built my jig, they kind of did. The joint itself is similar to a dovetail but without the angles, which makes it much easier to machine cut efficiently on a table saw. That is what makes box joints endearing to us woodworkers — they give you that hand-crafted look with repeatable precision once your jig is dialed in.
The strength is real, too. All those interlocking fingers create a massive glue surface. I have built boxes with box joints that I genuinely could not break apart during stress tests. Try that with a basic butt joint.
Jig Requirements — What You Actually Need
Probably should have led with this section, honestly. Before you start building anything, you need to understand the core components. The heart of a box joint jig is the indexing pin. This little pin is what spaces the fingers evenly across your workpiece. Without it, you are just making random cuts and hoping for the best.
You will need a dado blade stack that matches the width of the fingers you want. Quarter-inch fingers are a good starting point for most projects. The dado blade cuts the notches, and the indexing pin keeps everything spaced perfectly. Precise setup is absolutely essential here. I cannot stress that enough. Even a thousandth of an inch off on your indexing pin and you will get joints that are either too tight or too sloppy.
Test cuts on scrap wood are not optional. They are mandatory. I still make test cuts every single time I set up the jig, even after years of doing this. The wood thickness, moisture content, and even the specific dado blade you are using can all affect the final fit.
Building the Jig Step by Step
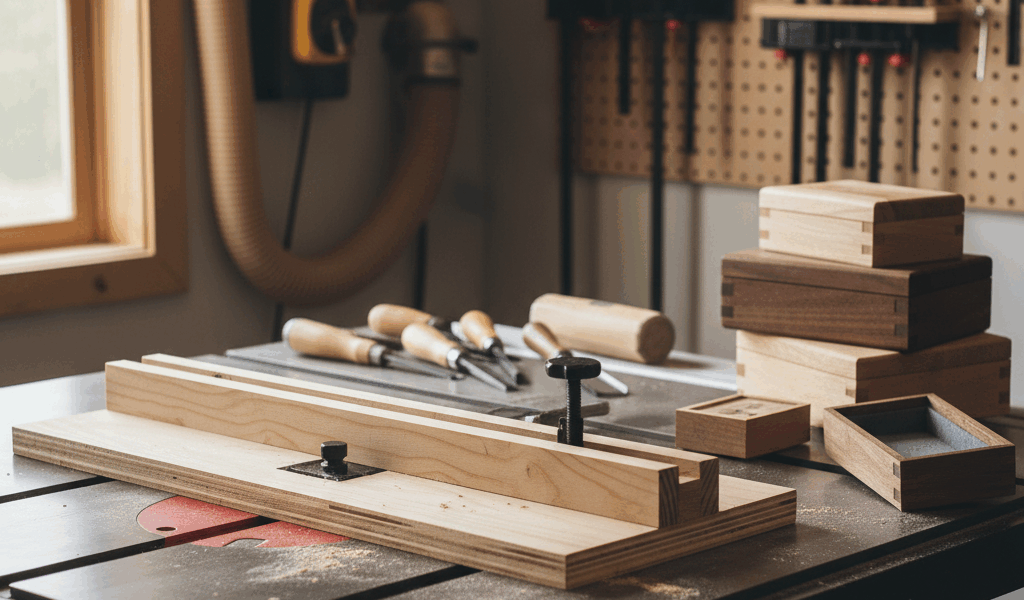
The jig itself is surprisingly simple. You need a fence that attaches to your miter gauge or crosscut sled, and an indexing key that sticks out from that fence. The key must match your dado blade width exactly — and I mean exactly. This is not a place for eyeballing.
I made my first jig from a piece of three-quarter-inch Baltic birch plywood for the fence and a hardwood key. The key should be the same width as your dado cut and stick out about the same distance as your stock thickness. Make it adjustable if you can. I drilled slotted holes in my fence so I could tap the key left or right with a mallet for micro-adjustments.
Mark your reference positions clearly. I use a fine-point Sharpie and a small square to mark where the key sits when the fit is perfect. That way, if something gets bumped, I can get back to zero quickly. Trust me on this one — I have lost a good setup before and spent an hour getting it back.
The Cutting Sequence That Works
Here is where most people mess up, and I was no exception the first few times. The first piece gets its first cut registered against the indexing key on one side. Then you shift the piece so the notch you just cut fits over the indexing pin, and make the next cut. Keep going until you reach the other edge.
Now here is the critical part. The mating piece must be offset by exactly one finger width. So you butt it against the key, place a spacer that matches the dado width, and make your first cut offset from where you started on the first piece. If both pieces start in the same position, the fingers will line up instead of interlocking, and you will have a pile of firewood instead of a box.
Alternate between the two pieces to check your fit as you go. Do not glue anything up until you have dry-fitted every joint and verified the fingers slide together with just light hand pressure. If you need a mallet to close the joint, it is too tight. If it falls together loosely, your indexing pin needs adjustment.
I keep a notebook next to my saw with the settings for each dado blade width and stock thickness combo that has worked well. Saves me setup time on future projects, and I would recommend you do the same.


Stay in the loop
Get the latest classic custom wood furniture updates delivered to your inbox.