Biscuit joiners have gotten complicated with all the debate about whether they’re overhyped or underrated. As someone who’s used plate joiners on hundreds of cabinet projects, I learned everything there is to know about when they make sense and when they don’t. Today, I will share it all with you.
You’re building a large tabletop from multiple boards. Keeping edges perfectly aligned during glue-up is frustrating — boards slip out of alignment as you apply clamps. Biscuit joiners solve this problem, but other woodworkers say biscuits don’t add meaningful strength. So which is it?
The answer: biscuit joiners excel at specific tasks — edge alignment, panel assembly, and quick case construction — but aren’t appropriate for structural joints or situations demanding maximum strength.
What Biscuit Joinery Actually Does
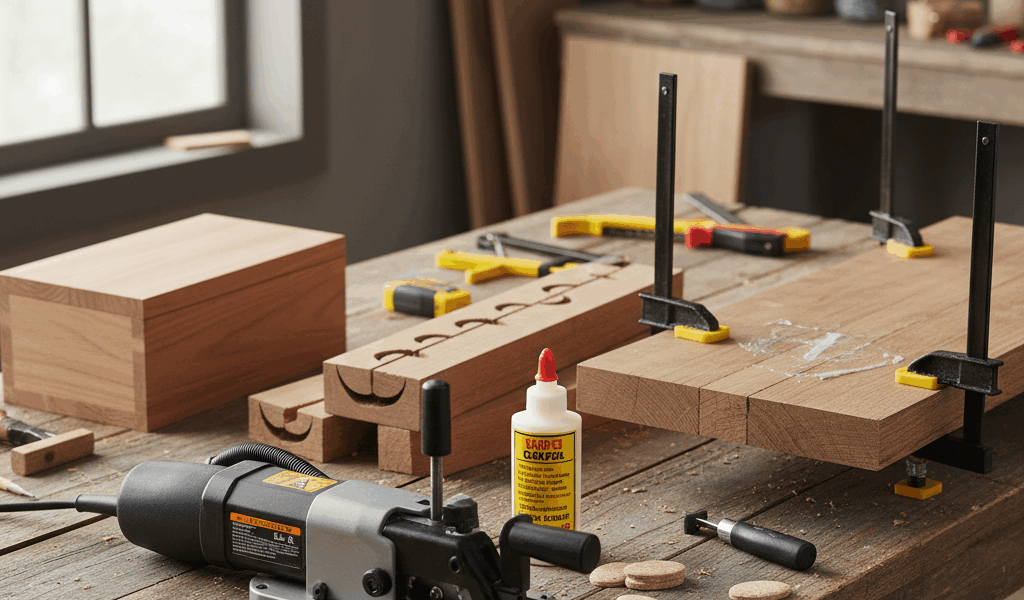
A biscuit joiner (also called plate joiner) cuts crescent-shaped slots in mating wood pieces. Compressed beechwood “biscuits” fit into these slots. When glue contacts biscuits, they swell, filling slots tightly and aligning pieces.
The process:
1. Mark layout lines on both pieces where joints will align
2. Set biscuit joiner fence to center slots in material thickness
3. Align joiner index mark with layout mark
4. Plunge joiner blade into wood, cutting crescent slot
5. Repeat on mating piece at same locations
6. Apply glue to slots and biscuits
7. Insert biscuits and join pieces
8. Clamp until dry
That’s what makes biscuit joiners endearing to us cabinet makers — they provide alignment, speed, hidden joinery, and modest strength increase. What they don’t provide: maximum strength, long-grain to end-grain strength, precision fit, or replacement for good glue joints.
Where Biscuit Joinery Excels
Edge Joining Panels
Probably should have led with this section, honestly. Creating wide panels from multiple narrow boards is where biscuit joiners prove most valuable.
The problem biscuits solve: During glue-up, boards slip vertically as you tighten clamps. One board ends up 1/16 inch higher than its neighbor. You spend time sanding to flatten — work that should be unnecessary.
Biscuit solution: Biscuits keep board edges aligned at same height during clamp-up. Minimal sanding needed after glue dries.
Space biscuits 6-12 inches apart along edge. Use #20 biscuits for material 3/4 inch or thicker. Use #10 biscuits for material 1/2 to 3/4 inch.
Strength consideration: Edge-to-edge long-grain glue joints are already extremely strong. Biscuits add minimal strength. Their value is alignment, not reinforcement.
Cabinet and Case Assembly
Building plywood cabinets or cases goes faster with biscuits than traditional joinery.
Applications: Attaching cabinet sides to top/bottom, joining face frames to cases, connecting shelving units, built-in cabinets and closet systems.
Why biscuits work here: Plywood doesn’t show well with exposed joinery anyway. Biscuits are quick — dozens of joints in minutes. Hidden joinery looks clean. Cabinet loads are shear forces which biscuits handle adequately when combined with glue and screws.
Best practices: Biscuits + glue (cleanest look), biscuits + screws without glue (allows disassembly), biscuits + glue + screws (maximum strength for heavy-duty storage).
Miter Joint Alignment
Mitered corners are difficult to align during glue-up. Biscuits register corners perfectly.
Cut miters accurately first — biscuits don’t fix bad cuts. Clamp mating pieces together, mark biscuit locations across joint, separate and cut slots, then glue and assemble.
Strength note: Biscuits in miters add some strength but miters are inherently weak. Don’t rely on biscuits alone for stressed joints. Add splines or corner blocks.
Face Frame Attachment
Attaching face frames to plywood cases is faster with biscuits than pocket screws and leaves no visible holes.
Benefits over pocket screws: No visible holes on interior, faster setup, better alignment.
Many cabinet makers use both — biscuits for alignment plus a few pocket screws for clamping force.
Where Biscuit Joinery Fails
Structural Joints Under Stress
Biscuits aren’t appropriate for joints bearing significant loads or experiencing racking forces.
Don’t use biscuits for: Table leg-to-apron joints, chair leg-to-seat joints, bed frame joints, drawer fronts to drawer sides. Use mortise-and-tenon, dowels, bridle joints, or dovetails instead.
Why biscuits fail here: They’re thin (3-4mm) and made from compressed wood that can crush under heavy loads. Slots are oversized, allowing movement.
End Grain Joinery
Biscuits inserted into end grain don’t hold well. End grain doesn’t glue well — wood fibers absorb glue like a sponge without creating strong bond.
Examples of bad end-grain biscuit joints: Leg-to-apron, shelf end to cabinet side, rail end to stile end. Use mortise-and-tenon or dowels instead.
Very Narrow Stock
Material under 1/2 inch thick may not accommodate biscuits without slots breaking through face/back. Thinner material needs splines, rabbet joints, or simply glue.
Biscuit Sizes and Selection
#0: 47mm x 15mm — for material 3/8″ to 1/2″ thick
#10: 53mm x 19mm — for material 1/2″ to 3/4″ thick, most common
#20: 56mm x 23mm — for material 3/4″ or thicker, maximum strength
Rule of thumb: Use largest biscuit that fits without breaking through surfaces.
Buying Considerations
Budget options ($100-150): Porter Cable, Ryobi, Skil. Adequate for occasional use but less precision and durability.
Mid-range ($150-300): DeWalt DW682K, Makita PJ7000. Better build quality, more powerful motors, dust collection ports.
Professional ($300-600): Lamello, Festool. Precision engineering, repeatable accuracy, durable for daily use.
Festool Domino ($1,000+) uses larger loose tenons for much stronger joints. Worth it for professional furniture makers needing strength plus speed.
Techniques and Tips
Fence Setup
Set fence to center slots in material thickness. Slightly offset (1/16″) toward one face to avoid exposing biscuits if you sand aggressively. Test on scrap first.
Layout Marks
Mark biscuit locations with pencil lines across both mating pieces while holding them together. Space 6-12 inches apart for edge-joining, every 10-15 inches for face frames.
Cutting Slots
Clamp workpiece securely. Align joiner index mark with layout line. Press fence firmly against workpiece. Plunge blade smoothly and retract immediately — don’t dwell in the cut.
Glue Application
Apply glue to both slots and biscuits. Don’t over-glue. Work quickly — biscuits swell immediately. Have clamps ready before applying glue.
Alternatives to Biscuits
Dowels: Stronger, works in end grain better, but requires precise drilling.
Pocket screws: Much stronger, no clamps needed, but leaves visible holes.
Domino: 3-5x stronger than biscuits, suitable for structural joints, but very expensive.
Mortise-and-tenon: Gold standard for furniture, maximum strength, but time-consuming.
Should You Buy One?
Buy a biscuit joiner if you build cabinets regularly, make wide panels frequently, or work with plywood cases needing quick hidden joinery.
Skip it if you primarily build fine furniture requiring maximum strength, have good edge-joining technique already, or budget is tight — put funds toward table saw, router, or jointer first.
Biscuit joiners are mid-tier tools — useful but not essential. Acquire foundational tools first.
The Verdict
Biscuit joiners are alignment tools that add modest strength, not structural joinery. They excel at speeding cabinet construction, registering panel glue-ups, and creating invisible joints in plywood cases. They fail at structural joints, end-grain applications, and situations demanding maximum strength.
Understand where biscuits excel and where they fail, and you’ll know whether plate joiners make sense for your work.
Common Mistakes to Avoid
Not Testing Fence Settings
The most common error: setting the fence and cutting slots in your actual workpieces without testing on scrap first. Fence adjustments that seem right often produce slots slightly too high or low. Test cuts reveal problems before they ruin your project pieces.
Always use scrap of the same thickness as your project material. Fence settings that work for 3/4-inch stock won’t transfer directly to 1/2-inch material.
Insufficient Clamping Pressure
Biscuits provide alignment but don’t provide clamping force. Without adequate clamps pulling joints tight, biscuits alone leave gaps. The glue-up requires the same clamping attention as any other edge joint — biscuits just make alignment easier.
Space clamps every 8-12 inches along glue lines. Alternate clamps above and below the panel to prevent cupping.
Cutting Slots Too Deep
Standard biscuit joiners have depth stops for different biscuit sizes. If you accidentally set too deep and cut through the face of thin stock, that piece is ruined. Always verify depth settings match both biscuit size and material thickness.
For plywood edge-banding, special shallow settings prevent breaking through veneer on the opposite face.
Rushing Glue-Up
Biscuits begin swelling immediately when glue contacts them. If you take too long inserting all biscuits, the first ones swell before you can close the joint. The result: joints that won’t close fully or pieces that don’t align despite the biscuits.
Prepare everything before opening the glue bottle. Dry-fit the entire assembly first. Have all clamps set to approximate opening width. Then work quickly through glue application and assembly.
Using Wet or Swollen Biscuits
Biscuits absorb moisture from the air. Bags left open in humid shops result in pre-swelled biscuits that don’t fit their slots. Store biscuits in sealed containers with desiccant packets. If biscuits feel thick or don’t slide easily into test slots, discard them.
Maintaining Your Biscuit Joiner
Biscuit joiners require simple maintenance to function reliably:
Blade inspection: Check for dull or chipped carbide. Dull blades tear fibers instead of cutting cleanly, producing loose slots. Replace blades when cuts become ragged. Most joiners use standard 4-inch blades available from multiple manufacturers.
Fence adjustment: Fences can shift over time. Periodically verify fence angle with a square. Most joiners allow fence adjustment via set screws — consult your manual for the procedure.
Dust collection: Biscuit joiners produce abundant fine dust. Use the dust port with a shop vacuum. Dust accumulation inside the tool causes bearing wear and motor problems. Blow out the interior periodically with compressed air.
Bearing and gear inspection: Listen for unusual sounds during operation. Grinding or squealing indicates bearing or gear problems. Have the tool serviced before components fail completely.
Real-World Project Applications
Building Kitchen Cabinets
Kitchen cabinet construction is where biscuit joiners earn their keep. A typical kitchen might include 20+ cabinet boxes, each with multiple biscuit joints. The time savings over traditional joinery is substantial.
Use biscuits to join case sides to top and bottom. Add biscuits connecting face frames to cases. For frameless (European-style) cabinets, biscuits align edge-banded parts during assembly.
Tabletop Glue-Ups
Wide tabletops from multiple boards represent the classic biscuit application. A 36-inch wide tabletop might require 4-5 boards joined edge-to-edge. Biscuits every 8-10 inches keep all boards aligned during clamping.
For figured or highly visible tops, consider whether biscuit slots might be exposed by future sanding or damage. Offset slots toward the underside if this is a concern.
Built-In Bookshelves
Biscuits excel at built-in construction where speed matters and joints are hidden. Shelves joining to sides, cases stacking together, face frames aligning to carcasses — all benefit from biscuit speed.
The ability to disassemble and reassemble is valuable for installations. Use biscuits for alignment but pocket screws for the actual fastening if future removal might be necessary.
Final Thoughts on Biscuit Joinery
After using biscuit joiners for years, my perspective is pragmatic: they’re excellent alignment tools that happen to add modest strength. They don’t replace traditional joinery for furniture, but they make cabinet work and panel assembly substantially faster.
If you build cabinets, closets, built-ins, or large panels regularly, a biscuit joiner pays for itself quickly in time saved. If your work centers on fine furniture or structural applications, the money goes better toward equipment that serves those needs.
The key is matching tool to task. Biscuits excel within their niche. Ask them to do what they weren’t designed for, and disappointment follows. Use them appropriately, and they become reliable shop companions.
Biscuit Joiner Accessories
Several accessories extend biscuit joiner capabilities:
Auxiliary fences: Some manufacturers offer specialized fences for compound angles, narrow stock, or specific applications. These can justify themselves on repetitive production work.
Dust collection adapters: If your joiner’s dust port doesn’t fit your shop vacuum, adapters make the connection. Essential for maintaining air quality during extended use.
Carrying cases: Protect the joiner during transport and keep accessories organized. Quality hard cases protect the precision fence and blade better than soft bags.
Biscuit storage containers: Keep biscuits dry and accessible. Small plastic containers with tight lids work fine. Some woodworkers use mason jars with desiccant packets.
Extra blades: Having spare blades means you can replace dull blades immediately rather than waiting for orders. Quality carbide blades last through hundreds of slots in solid wood but wear faster in MDF and particleboard.

Stay in the loop
Get the latest classic custom wood furniture updates delivered to your inbox.